

Although some mobile applications are completely self contained (like calculators, soundboards, flashlight apps), many applications rely on pulling in data from an external source to function. Facebook has to pull in data for news feeds, Instagram the latest photos, weather apps the latest weather forecasts and so on.
You may have seen my recent blog post on how I released an Ionic 2 app on the app store, which required pulling in remote data. In this tutorial I’m going to show you how I did that, and how you can use the Http service to pull data into your own applications.
Before we Get Started
Last updated for Ionic 3.0.0
Before you go through this tutorial, you should have at least a basic understanding of Ionic 2 concepts. You must also already have Ionic 2 set up on your machine.
If you’re not familiar with Ionic 2 already, I’d recommend reading my Ionic 2 Beginners Guide first to get up and running and understand the basic concepts. If you want a much more detailed guide for learning Ionic 2, then take a look at Building Mobile Apps with Ionic 2.
1. Generate a New Application
Let’s start by generating a new Ionic 2 application by running the following command:
ionic start ionic2-http blank --v2Since we will be using the Http service in this tutorial, we will need to import the HttpModule in our app.module.ts file.
Modify src/app/app.module.ts to reflect the following:
import { BrowserModule } from '@angular/platform-browser';
import { HttpModule } from '@angular/http';
import { NgModule, ErrorHandler } from '@angular/core';
import { IonicApp, IonicModule, IonicErrorHandler } from 'ionic-angular';
import { MyApp } from './app.component';
import { HomePage } from '../pages/home/home';

import { StatusBar } from '@ionic-native/status-bar';
import { SplashScreen } from '@ionic-native/splash-screen';

@NgModule({
  declarations: [MyApp, HomePage],
  imports: [BrowserModule, HttpModule, IonicModule.forRoot(MyApp)],
  bootstrap: [IonicApp],
  entryComponents: [MyApp, HomePage],
  providers: [
    StatusBar,
    SplashScreen,
    { provide: ErrorHandler, useClass: IonicErrorHandler },
  ],
})
export class AppModule {}
2. Create a List
Before we pull in some data to display in the application, we’re going to set up a list with an empty data source. As is usually the case when we are implementing a feature in Ionic 2, we will need to take care of two main things:
- The class definition for the component which will hold (and eventually fetch) the data
- The template file that will control what is displayed to the user
Since the blank application template we used to generate our application already contains a home component, we will make use of that for this tutorial.
Modify scr/pages/home/home.ts to reflect the following:
import { Component } from '@angular/core';
import { NavController } from 'ionic-angular';

@Component({
  selector: 'page-home',
  templateUrl: 'home.html'
})
export class HomePage {

  posts: any;

  constructor(public navCtrl: NavController) {

  }
}
We haven’t really done much at all here, all we’ve done is set up an empty member variable called posts. Eventually, we will fill this with data that we pull in from a remote server, but for now, we are just defining it to prevent the application from complaining when we reference it in the template. Speaking of which…
Modify src/pages/home/home.html to reflect the following:
<ion-header>
  <ion-navbar>
    <ion-title>Home Page</ion-title>
  </ion-navbar>
</ion-header>

<ion-content>
  <ion-list>
    <ion-item *ngFor="let post of posts">
      <img [src]="post.data.url" />
    </ion-item>
  </ion-list>
</ion-content>
Now we’re creating a list, and we are creating an item for each of the posts we have in our posts variable (which is none right now). Inside of the ngFor we are creating an image with a src of post.data.url. When we do eventually pull in some data, this will reference the url of a particular post.
The reason we are using [src] and not src is so that our application knows to evaluate post.data.url as an expression, not use it literally as the source. If we were to just use src it would set the source of the image as post.data.url rather than whatever that evaluates to, which would be something like http://blahblah.com/myimage.gif. This is similar to using double braces likes {{this}} to evaluate an expression.
If you take a look at the application now using the ionic serve command, you won’t see a whole lot. So let’s change that.
3. Fetch Data Using the Reddit API
We’re going to be pulling in some data into the application now by using the reddit API. There’s a lot of cool things you could do with the reddit API, but the reason I wanted to use it for this tutorial is because they provide a very easy to access JSON feed (which is a great format for pulling data into your Ionic applications).
You can create a JSON feed of posts from subreddits simply by visiting a URL in the following format:
https://www.reddit.com/r/gifs/top/.json?limit=10&sort=hot
If you click on that link, you will see a JSON feed containing 10 submissions from the gifs subreddit, sorted by the hot filter. If you’re not familiar with JSON, I would recommend reading up on it here – but essentially it stands for JavaScript Object Notation and is a great way to transmit data because it is very readable to humans, and is also easily parsed by computers. If you’ve ever created a JavaScript object like this:
var myObject = {
  name: 'bob',
  age: '43',
  hair: 'purple',
};
then you should be able to read a JSON feed pretty easily once you tidy it up a little. But how do we get it into our Ionic 2 application?
The answer is to use the Http service which is provided by Angular 2, and allows you to make HTTP requests. If you’re not familiar with what a HTTP request is you can read about it here, but basically every time your browser tries to load anything (a document, image, a file etc.) it sends a HTTP request to do that. The Http service allows us to send off our own requests to retrieve data.
Modify src/pages/home/home.ts to reflect the following
import { Component } from '@angular/core';
import { NavController } from 'ionic-angular';
import { Http } from '@angular/http';
import 'rxjs/add/operator/map';

@Component({
  selector: 'page-home',
  templateUrl: 'home.html'
})
export class HomePage {

  posts: any;

  constructor(public navCtrl: NavController, public http: Http) {

    this.http.get('https://www.reddit.com/r/gifs/new/.json?limit=10').map(res => res.json()).subscribe(data => {
        this.posts = data.data.children;
    });

  }
}
We’ve added a couple of imports here, namely Http and the map operator. Http is imported for obvious reasons, but the map import looks a little funky and out of place. The reason we need this is because of the map function we are calling when we use http.get (which I will explain shortly) – in earlier versions of Angular 2 this was included by default so you wouldn’t have to worry about importing it, but anything from the rxjs library seems to need to be manually imported now. This may change in the future, it may not, but for now you’ll just need to remember to add that import when using the map operator.
In order to use Http we need to pass a reference to it through our constructor. We use the static get parameters function to inject the Http service into our constructor. We then assign it to this.http so that we can easily use it anywhere within this class.
Then comes the tricky bit – we use get to retrieve the JSON data from the URL and then assign the data we want to this.posts which is simple enough, but what’s with all that crazy syntax… map, subscribe, fat arrows?
The reason for this new syntax is because Angular 2 is moving towards using Observables, which is provided by the RxJS (Reactive Extensions library. For a bit of a primer on RxJS, check out this video and this video from egghead.io.
So to step through what happens here: http.get returns the result of the request in the form of an Observable, map converts the result into a JSON decoded version of the result, and subscribe allows us to access the data that is returned. In this case we are only handling the success case, but by using subscribe we will also be notified if an error occurs and we can handle that as well like this:
.subscribe(
    data => {
        this.posts = data.data.children;
    },
    err => {
        console.log("Oops!");
    }
);
If you run ionic serve now you should see something like this:
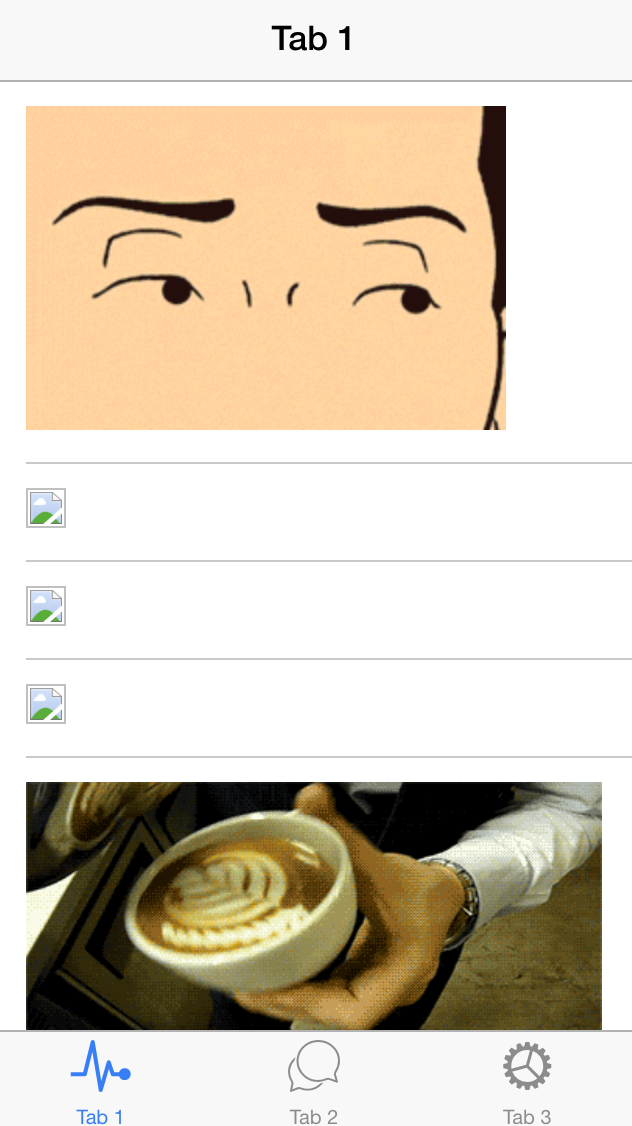
Keep in mind that we are assuming that the results returned from reddit will link through to an image, so this will work for subreddits like gifs or others that predominantly contain images, but the application wouldn’t be able to handle other types of posts (as you can see by the broken images above).
IMPORTANT: Remember, Http requests are asynchronous. This means that your code will continue executing whilst the data is being fetched, which could take anywhere from a few milliseconds, to 10 seconds, to never. So it’s important that your application is designed to deal with this. To give you an example, if you were to run the following code:
this.posts = null;

this.http
  .get('https://www.reddit.com/r/gifs/top/.json?limit=2&sort=hot')
  .map((res) => res.json())
  .subscribe((data) => {
    this.posts = data.data.children;
  });

console.log(this.posts);
You would see null output to the console, because the console.log runs immediately after we make the get call, it doesn’t wait for it to finish fetching the data. But if you were to run:
this.posts = null;

this.http
  .get('https://www.reddit.com/r/gifs/top/.json?limit=2&sort=hot')
  .map((res) => res.json())
  .subscribe((data) => {
    this.posts = data.data.children;
    console.log(this.posts);
  });
You would see the posts output to the console, because everything inside of the subscribe function will only run once the data has been returned.
4. Pulling in Data From Your Own Server
We know how to pull in data using a JSON feed like the one provided by reddit, but what if you want to pull in your own data? How can you go about setting up your own JSON feed?
Going into the detail of how to do this is a bit beyond what I wanted to achieve with this tutorial, but if you want more information you can check out a previous tutorial I’ve done on loading in map markers from a remote server in Ionic 1. This is a reasonably complex example, but all it comes down to in the end is:
- Fetch the data using whatever server side language you prefer
- Output that data to the page in JSON format
In the tutorial I linked above I’m using PHP, so I’ll give you a quick example of how you might implement a simple API with PHP.
- Create a file called feed.php that is accessible at http://www.mywebsite.com/api/feed.php
- Retrieve the data, in this case I’m doing that by querying a MySQL database but the data can come from anywhere:
$mysqli = new mysqli("localhost", "username", "password", "database");
$query = "SELECT * FROM table";
$dbresult = $mysqli->query($query);

while($row = $dbresult->fetch_array(MYSQLI_ASSOC)){

    $data[] = array(
        'id' => $row['id'],
        'name' => $row['name']
    );
}

if($dbresult){
    $result = "{'success':true, 'data':" . json_encode($data) . "}";
}
else {
    $result = "{'success':false}";
}- Output the JSON encoded data to the browser:
echo($result);- Use http://www.mywebsite.com/api/feed.php in your http.get() call in your application
It’s important to note that you can use whatever language and whatever data storage mechanism you like to do this. Just grab whatever data you need, get it in JSON format, and then output it to the browser.
Summary
This should give you a pretty reasonable overview of how to fetch remote data using Ionic 2 and the Http service. The syntax might be a little tricky to get your head around at first, but once you’ve got this working there’s not really much more you need to know. Your data might get more complex and you might want to perform some fancier operations on it or display it in a different way, but the basic idea will remain the same.
As I mentioned before, this application assumes that the incoming results are links to images. As a bit of a homework task for this tutorial, you could try making some changes so that either the application handles all types of posts, or it ignores any posts that don’t link to images.