

Javascript frameworks like Ionic can be complicated beasts, and as a beginner the sprawling files and folders all over the place can be intimidating.
On top of actually learning how the framework works, you also need to make sure your code, files and folders stay well structured and easy to maintain. It’s easy to skip over this stuff as a beginner and end up with a really messy set up that makes you cringe every time you look at it.
A lot of frameworks either encourage or support the use of popular architectural patterns like MVC Model View Controller. The point of using these patterns is to create some form of organisation for your project – it really pays off when your projects starts getting larger and more complex.
I came to Ionic with a background in Sencha Touch – if you’re making a similar transition be sure to take a look at the Learning the Ionic Framework as a Sencha Touch Developer series. Sencha Touch strongly enforces an MVC structure which can be a little tricky to get started with, but keeps the project very well organised.
When I was getting started with Ionic, there didn’t seem to be any strict guidelines around how a project should be structured. This is both good and bad; good because it allows you the freedom to implement whatever structure you wish, bad because that can be hard to figure out.
After a bit of searching I came to the conclusion that there are two main approaches to organising an Ionic application. I have dubbed them the easy way and the hard way. The easy way follows the standard structure of an Ionic application and splits up all the controllers and services into a separate module. The hard way which is perhaps more scalable organises the code by feature, rather than by class type.
The Easy Way to Structure an Ionic Application
Organising an Ionic application into class types is probably the most commonly used method right now. This method involves separating your controllers and services out into separate files rather than having them all within the single app.js file.
We can create separate modules for our controllers and services, and then include them in the main module for the application. This might look something like this.
app.js
angular
  .module('ionicApp', ['ionic', 'controllers', 'services'])

  .config(function ($stateProvider, $urlRouterProvider) {
    $stateProvider
      .state('intro', {
        url: '/',
        templateUrl: 'templates/intro.html',
        controller: 'IntroCtrl',
      })
      .state('main', {
        url: '/main',
        templateUrl: 'templates/main.html',
        controller: 'MainCtrl',
      });

    $urlRouterProvider.otherwise('/');
  });
controllers.js
angular
  .module('controllers', [])

  .controller('IntroCtrl', function ($scope) {})

  .controller('MainCtrl', function ($scope) {});
services.js
angular
  .module('services', [])

  .factory('MyFactory', function () {});
As you can see above, I’ve created two new modules for my controllers and services and then required those in the main module in app.js. This is fairly maintainable for small projects, but these files will become unruly before too long. You could further modularise this code by separating each controller and service out into it’s own file, so your folder structure might end up looking something like this:
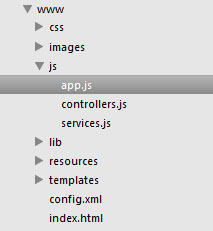
I would recommend that beginners to the Ionic framework implement this approach. It’s easy to understand right away and reasonably scalable. If you’re working on a large or complex project though, it might be worth investigating the hard way…
The Hard Way to Organise an Ionic Application
It isn’t really that hard, but perhaps a little more confusing to understand conceptually. The idea of splitting up code based on features is gaining a lot of popularity in the community, even among the framework developers themselves. There’s a great post over at johnpapa.net that explains the separation by feature concept in more detail. The picture below is from that post, and shows what the folder structure might look like for an Ionic application organised by feature (on the right):

As you can see above each folder is some feature, and all of the code required for that feature is contained within it. Usually you would have all of your HTML template files in their own templates folder, but when organising by feature even they are included in the same folder as the rest of the code relevant to that feature.
If you’re interested in implementing this structure, I highly recommend reading the blog post linked above, but in summary: organising your code by feature makes it easy to:
- Easily find code relevant to what you’re working on
- Keep your codebase tidy
- Collaborate with other developers since you won’t need to be working on the same files
Whichever approach you do decide to go with, I highly recommend that you do at least invest some time into picking up some kind of architectural pattern – you’ll be glad you did in the long run.