

Most applications rely heavily on data, so it’s important that we know how best to manipulate that data in order to make it do what we want. Sometimes this data is stored on some remote server, sometimes it’s stored locally, but in both cases, we quite often make use of Angular 2’s Http service to retrieve that data.
In this tutorial, we are going to discuss how exactly the http.get() method works, and how we can hook into that process to return data in a more friendly format. We will be discussing some specifics of observables, and also introduce the concept of mapping.
We will expand on these concepts in a more general sense in Part 2 of this tutorial series, and we will also introduce two more ways to manipulate data in your applications: filtering and reducing.
An In-Depth Look at the Http GET method
It’s pretty easy to use Http in Angular 2 to fetch data, but understanding how it works is another matter. You may be familiar with using the following syntax to make a GET request:
this.http
  .get('location/of/data')
  .map((res) => res.json())
  .subscribe((data) => {
    console.log(data);
  });
This will make a request to the location we provide – which could be a web URL or a path to a local JSON file – and return the data we want. If you want to grab some data from somewhere else, you just need to change location/of/data and forget about the rest of the magic. This will work if your data requirements are simple, but if you want to start manipulating your data in more complex ways, it is important to understand what is happening here and what tools are available for us to use.
The first strange thing about the above request is the use of subscribe instead of then. Usually, you would expect the code to look more like this:
this.http.get('location/of/data').then((data) => {
  console.log(data);
});
However, the code above will not work. A then handler is only used on a Promise, but the get method above will return an Observable. I’m not going to go in-depth into the difference between promises and observables here, so if you would like more information on that I would recommend watching RxJS Observables vs Promises. The main difference is that an Observable can emit multiple values over time, whereas a Promise will only emit a value once.
So since we know get will return an observable, and we know we need to subscribe to an observable, it makes sense to set up our code like this:
this.http.get('location/of/data').subscribe((data) => {
  console.log(data);
});
This is still missing the map section from our original code though, so what does map do? If we were to just use the code above it will still work, but we will get a Response object back from the call, most of which is not of much use to us:
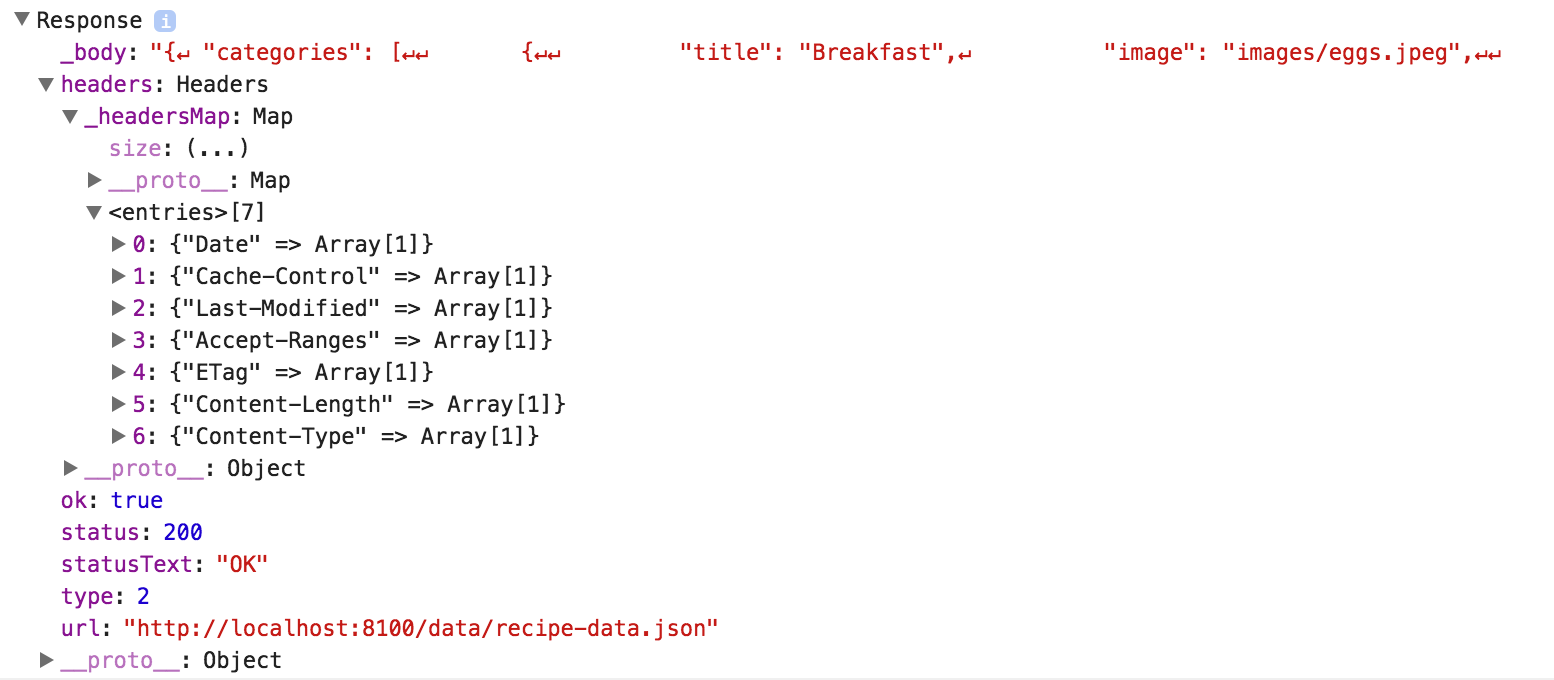
As you can see above, the JSON response is inside of the _body property which we could access if we wanted, but it is currently just a JSON string (it is not yet a Javascript object that we can easily work with). There is also a lot of other information contained in this object like the headers, HTTP response code, the URL the request was made to, and so on. We do not need any of this, we just want the data. So we use map to transform this response into something we can more easily use.
An Introduction to Mapping Observables and Arrays
In Javascript, mapping is a method available on arrays which allows you to “map” or “transform” each value in that array. Keep in mind that in the example above we are not mapping an array, we are mapping an observable – this functionality is provided by the RxJS library (which is included in Ionic 2 & Angular 2), it is not in Javascript by default.
To give you an example of how normal array mapping works (the concept is basically the same for observables), I could take an array of the following numbers:
[1, 2, 3, 4, 5];and map the array using a function that increments each value by one, which would transform the array into the following:
[2, 3, 4, 5, 6];This would look something like this:
[0, 1, 2, 3, 4, 5].map(function (item) {
  return item + 1;
});
We supply map with a function, and then the map will run that function for every value in the array. Whatever we return from that function is what the new value of the item will be – in this case, that is the same number incremented by one. If we instead did something like return 5;, it would turn every value in the array into a 5.
We are going to learn more about this in the next tutorial, but we are using a similar concept with our observable from Http as well. We use map to transform the response into something we can work with. To do that, we create a function that will be applied to each item returned from our observable (which is just the single Response object in this case). The function looks like this:
(res) => res.json();which is shorthand for:
(res) => {
  return res.json();
};
This looks a little bit different to the function we created before, but that’s mainly because of the ES6 syntax we are using that is available to us in an Ionic 2 project. You could also write the above as:
function(res){
    return res.json();
}
Since our observable only returns one item, that item will be passed into this function. We can then do whatever we want to that item to modify it, and then return it. In this case we call the json() method on the item, which is a function available on the Response object returned that will parse the JSON data that was retrieved into a nice Javascript object that we can use.
The map function will return a new observable once it has completed, so we can still subscribe to the result of the map function. Combining everything we have talked about above will result in our original code:
this.http
  .get('location/of/data')
  .map((res) => res.json())
  .subscribe((data) => {
    console.log(data);
  });
which will return us a nice Javascript Object:
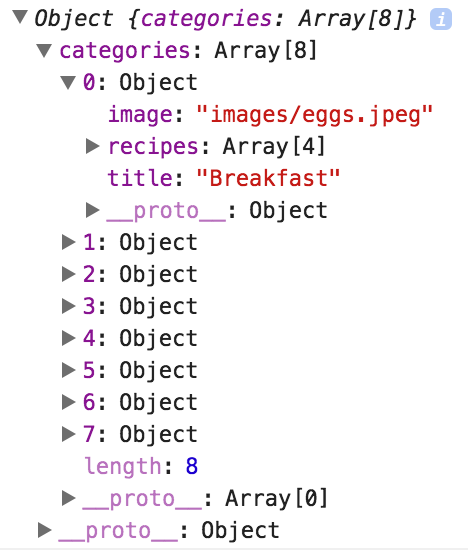
If we weren’t using map, the following code would also achieve the same result:
this.http.get('location/of/data').subscribe((data) => {
  console.log(data.json());
});
However, to give an example of why it’s useful to understand how mapping observables works, let’s say that the resulting object contains multiple properties (e.g. categories, users, and posts), and let’s say we only want the categories data. Now that we understand how map works, we can extend it a little further:
this.http
  .get('location/of/data')
  .map((res) => res.json().categories)
  .subscribe((data) => {
    console.log(data);
  });
Now after the response has been converted into a Javascript object, we then grab the categories property specifically before returning it. Now the result will only contain categories and not the rest of the object. Not only is this code nice and clean, but since we handle this operation in the map, which returns an observable, we can then chain on other operators to modify the observable (like filter and reduce) before subscribing to the result if we want.
Again, the important thing to remember about the use of map here is that we are mapping an Observable, not an array. If you had an observable that returned an array of data, you might expect that using map on the observable would be able to map each value in that array of data to another value.
That is not the case with an observable though, the array that is emitted from the observable is one single item (each time the observable emits some data, that is one “item”), and so the map function only applies to the array as a whole. The idea is that if your observable then emits another array later, the same map function will apply to that array and so on for every time that the observable emits some data.
If you want to map an array of data that is returned from an observable, you should instead use the normal map function that is available directly on the array itself (not the observable) like this:
.map(res => {
    return res.json().map((item) => {
        return /* do something to the item */;
    })
})
This may look a little confusing right now, but we will be covering this in a lot more detail in the next tutorial. Remember that map is a method that is available on arrays anywhere – it doesn’t need to be inside of an observables map function, and it doesn’t even need to be inside of an Ionic or Angular project. In fact, you can paste the following directly into your browsers Console, hit enter, and it will work:
[0, 1, 2, 3, 4, 5].map(function (item) {
  return item + 1;
});
Mapping – as well as filtering and reducing – is generally more useful to us when we are working with arrays (as the code above does). Performing these operations on observables can be useful in more complex scenarios, but in most circumstances, you won’t use map on an observable for much more than converting the JSON string in the Response object to a nice Javascript object.
. As an aside, filtering and reducing are also available on both observables and arrays, and like map they also return a new observable, so you can create long complex chains like this:
this.http
  .get('location/of/data')
  .map((res) => res.json())
  .filter(/*some function*/)
  .reduce(/*some function*/)
  .subscribe((data) => {
    console.log(data);
  });
but again, generally, it is more useful to use the filter and reduce operations directly on an array, rather than on the observable like this.
Summary
Hopefully this tutorial clears up exactly what is happening when using the get method of the Http service, and also how you can modify that process to suit your own needs.
In the next tutorial, we will continue to talk more about what we can do with mapping in a more general sense, as well as introducing filtering and reducing.