

In Part 1 of this tutorial series we started to build an application that would display a map with some markers on it, and a separate text-based list of places that were marked on the map. The list will sort the places by their proximity to the user’s current location, and display the distance to each location underneath the name of the place.
To refresh your memory, the concepts we are aiming to cover in this tutorial series are:
- Loading data from a JSON source
- Displaying multiple markers in Google Maps
- Calculating the distance between two points, and mapping that information into an array
- Ordering data and displaying it in a list (ordered from lowest to highest)
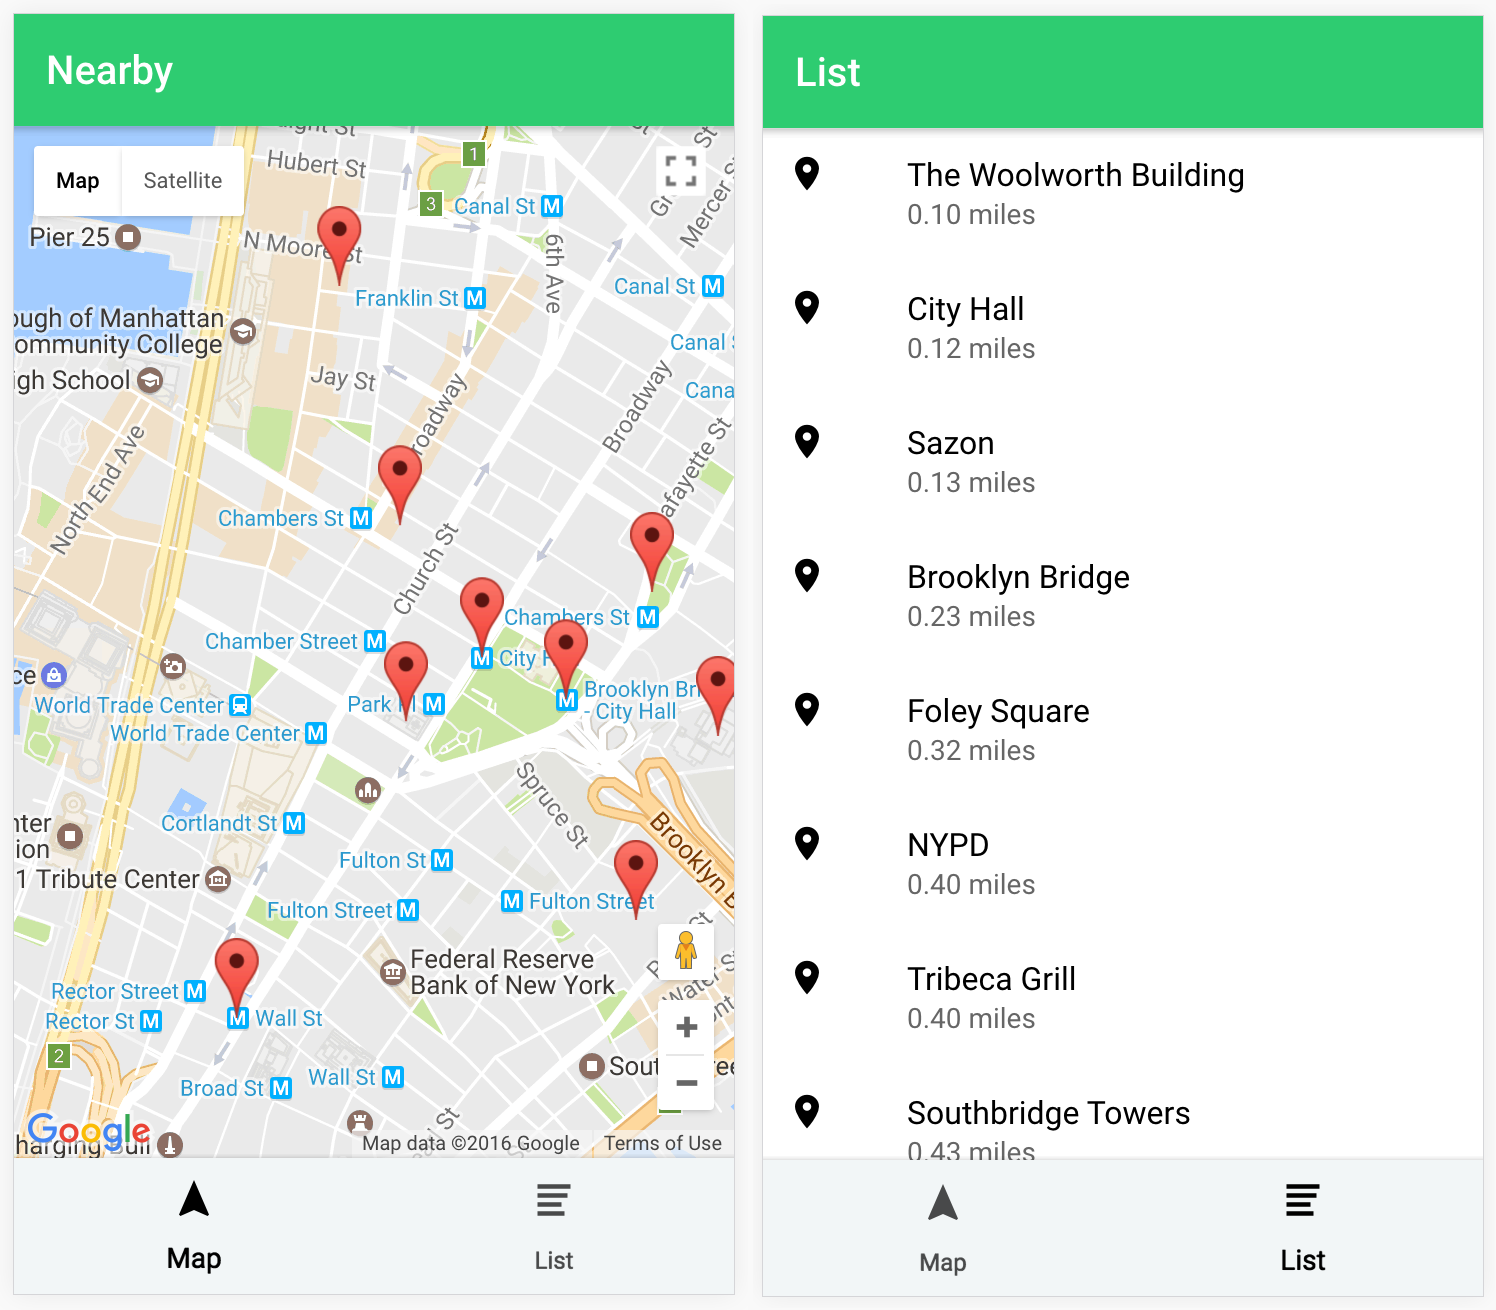
and the final result should look like this:
So far, we have set up the map and our list, but the map doesn’t contain any markers and the list only contains dummy information. In this tutorial, we will be extending the application so that we can display markers on the map, and display some real data (along with the calculated proximity information) in the list.
Before We Get Started
If you want to code along with this tutorial, then you need to have already finished Part 1. However, if you are just here to learn about some of the concepts we will be making use of then you don’t necessarily have to complete the previous tutorial first.
1. Import Location Data from a Static JSON File
The first thing we are going to do is set up the JSON file that will store all of the information for the locations we are interested in. We will be storing this JSON file locally within the project, but it would be quite easy to modify this so that the JSON was instead retrieved from a remote server (which is the more likely scenario for a real-world application).
Create a file called locations.json at src/assets/data/locations.json (you will need to create the data folder)
Modify locations.json to reflect the following:
{
	"locations": [

		{
			"title": "City Hall",
			"latitude": 40.713484,
			"longitude": -74.006739
		},
		{
			"title": "Brooklyn Bridge",
			"latitude": 40.712801,
			"longitude": -74.004936
		},
		{
			"title": "NYPD",
			"latitude": 40.712199,
			"longitude": -74.001675
		},
		{
			"title": "The Woolworth Building",
			"latitude": 40.712443,
			"longitude": -74.008369
		},
		{
			"title": "Foley Square",
			"latitude": 40.714541,
			"longitude": -74.003091
		},
		{
			"title": "Sazon",
			"latitude": 40.715631,
			"longitude": -74.008498
		},
		{
			"title": "Southbridge Towers",
			"latitude": 40.709206,
			"longitude": -74.003434
		},
		{
			"title": "Wall St",
			"latitude": 40.707612,
			"longitude": -74.011996
		},
		{
			"title": "Tribeca Grill",
			"latitude": 40.719518,
			"longitude": -74.009807
		}
	]
}
This is a JSON string for an array of locations around New York City. I just grabbed a bunch of latitudes and longitudes using this tool. This file will allow us to load these locations into our application, which we are going to create a provider for right now.
Modify src/providers/locations.ts to reflect the following:
import { Injectable } from '@angular/core';
import { Http } from '@angular/http';
import 'rxjs/add/operator/map';

@Injectable()
export class Locations {

    data: any;

    constructor(public http: Http) {

    }

    load(){

        if(this.data){
            return Promise.resolve(this.data);
        }

        return new Promise(resolve => {

            this.http.get('assets/data/locations.json').map(res => res.json()).subscribe(data => {

                this.data = data.locations
                resolve(this.data);

            });

        });

    }

}
This will handle loading the data into the application by making a HTTP request to the JSON file we created. We convert the JSON string into a Javascript object by mapping the response and calling the .json() method. Now we will be able to call the load function from elsewhere in our application and it will return the array of location data.
We’re not done with this yet though, we want to add a little magic to the locations data before we return it.
2. Implement the Haversine Formula to Calculate Distances
Before we return the data from the provider we created in the last step, we want to do two things to it:
- Modify the data to include the distance each location is from the user’s current position
- Sort the array based on how close
To do this we are going to make use of the Haversine Formula, which allows you to work out the distance between two points given their latitude and longitude coordinates.
We will also be using the map method that is available on arrays. This allows us to take an existing array, and change it in some way based on a function. If this concept is not familiar to you, I would highly recommend reading another tutorial of mine called Filtering, Mapping, and Reducing Arrays in Ionic 2.
So, we are going to calculate distances using the Haversine Formula, and then apply them to our existing array of locations by using the map method.
Modify src/providers/locations.ts to reflect the following:
import { Injectable } from '@angular/core';
import { Http } from '@angular/http';
import 'rxjs/add/operator/map';

@Injectable()
export class Locations {

    data: any;

    constructor(public http: Http) {

    }

    load(){

        if(this.data){
            return Promise.resolve(this.data);
        }

        return new Promise(resolve => {

            this.http.get('assets/data/locations.json').map(res => res.json()).subscribe(data => {

                this.data = this.applyHaversine(data.locations);

                this.data.sort((locationA, locationB) => {
                    return locationA.distance - locationB.distance;
                });

                resolve(this.data);
            });

        });

    }

    applyHaversine(locations){

        let usersLocation = {
            lat: 40.713744,
            lng: -74.009056
        };

        locations.map((location) => {

            let placeLocation = {
                lat: location.latitude,
                lng: location.longitude
            };

            location.distance = this.getDistanceBetweenPoints(
                usersLocation,
                placeLocation,
                'miles'
            ).toFixed(2);
        });

        return locations;
    }

    getDistanceBetweenPoints(start, end, units){

        let earthRadius = {
            miles: 3958.8,
            km: 6371
        };

        let R = earthRadius[units || 'miles'];
        let lat1 = start.lat;
        let lon1 = start.lng;
        let lat2 = end.lat;
        let lon2 = end.lng;

        let dLat = this.toRad((lat2 - lat1));
        let dLon = this.toRad((lon2 - lon1));
        let a = Math.sin(dLat / 2) * Math.sin(dLat / 2) +
        Math.cos(this.toRad(lat1)) * Math.cos(this.toRad(lat2)) *
        Math.sin(dLon / 2) *
        Math.sin(dLon / 2);
        let c = 2 * Math.atan2(Math.sqrt(a), Math.sqrt(1 - a));
        let d = R * c;

        return d;

    }

    toRad(x){
        return x * Math.PI / 180;
    }

}
This is our completed Locations provider, so let’s talk through what it does. Previously, we were just resolving this.data immediately, but now we call applyHaversine and sort first.
The applyHaversine function first defines the users location (which in this case I have just hard coded as somewhere in New York City, you will likely want to use the user’s actual location). We then call the map method which will iterate through each element in the array and create a new property on each element called distance. The distance is calculated by passing the start and end coordinates into the getDistanceBetweenPoints function, which will calculate the distance using the Haversine Formula. We also use the toFixed method to trim the result to 2 decimal places.
Once we have the distances added to the data in the array, we call the sort method to sort the locations based on the distance from lowest to highest. The sort method is similar in concept to the map method, but if you would like a more detailed explanation of how it works I would recommend reading this article on the Mozilla Developer Network, specifically the section about the compareFunction which we are making use of above.
3. Add Markers to the Map
We’ve already added our map to the application using the Google Maps JavaScript SDK, and we even have a method in our provider to add markers for us, but we still need to add them based on the data we are loading into the application.
Modify src/pages/map/map.ts to reflect the following:
import { Component, ElementRef, ViewChild } from '@angular/core';
import { Locations } from '../../providers/locations';
import { GoogleMaps } from '../../providers/google-maps';
import { NavController, Platform } from 'ionic-angular';

@Component({
  selector: 'page-map',
  templateUrl: 'map.html'
})
export class MapPage {

    @ViewChild('map') mapElement: ElementRef;
    @ViewChild('pleaseConnect') pleaseConnect: ElementRef;

    constructor(public navCtrl: NavController, public maps: GoogleMaps, public platform: Platform, public locations: Locations) {

    }

    ionViewDidLoad(){

        this.platform.ready().then(() => {

            let mapLoaded = this.maps.init(this.mapElement.nativeElement, this.pleaseConnect.nativeElement);
            let locationsLoaded = this.locations.load();

            Promise.all([
                mapLoaded,
                locationsLoaded
            ]).then((result) => {

                let locations = result[1];

                for(let location of locations){
                    this.maps.addMarker(location.latitude, location.longitude);
                }

            });

        });

    }

}
Before, we were just loading the map, but now we want to load the map and then add the markers (it is important that we wait for the map to load before trying to add the markers). We also need to wait for our location data to finish loading once we make the call to the Locations provider.
Since we are waiting on two promises to resolve, we make use of the Promise.all method, which we can supply multiple promises to. This will wait until all the promises supplied have resolved before invoking the .then() handler. Once the promises do resolve, a single result is passed in, which is an array containing the data from all the promises that have resolved. We are only interested in the data returned from the Locations provider, and we access that through result[1].
We then loop through each of the locations and call the addMarker function in our Google Maps provider for each of them.
4. Display Location Information in the List
Now we just need to display the location data, along with the distance information, in the list tab.
We’ve done the hard bits already. We calculated the distances we want to display in the Locations provider, and we have already made a call to load the data into the provider through the map page. So all we need to do is display the data in the template.
Modify src/pages/list/list.ts to reflect the following:
import { Component } from '@angular/core';
import { NavController } from 'ionic-angular';
import { Locations } from '../../providers/locations';

@Component({
  selector: 'page-list',
  templateUrl: 'list.html'
})
export class ListPage {

  constructor(public navCtrl: NavController, public locations: Locations) {}

  ionViewDidLoad() {
    console.log('Hello ListPage Page');
  }

}
Modify src/pages/list/list.html to reflect the following:
<ion-header>
  <ion-navbar color="secondary">
    <ion-title>List</ion-title>
  </ion-navbar>
</ion-header>

<ion-content>
  <ion-list no-lines>
    <ion-item *ngFor="let location of locations.data">
      <ion-avatar item-left>
        <ion-icon name="pin"></ion-icon>
      </ion-avatar>
      <h2>{{location.title}}</h2>
      <p>{{location.distance}} miles</p>
    </ion-item>
  </ion-list>
</ion-content>
We first inject the Locations provider into the TypeScript file, and then we loop through the data that is stored in the provider using *ngFor. This will loop through each location and display its title, along with how far away it is from the user in miles!
Summary
The application is completely finished now, if everything has gone correctly it should now look something like this:
We’ve covered a lot of really useful concepts in this tutorial, including how to integrate Google Maps, add multiple markers to the map, how to calculate the distance between two coordinates, and also how to modify an array to include that data.
The only modifications that should be required to this tutorial if you want to use it in a real-world scenario, is to change the hard coded value of the user’s location so that it uses the coordinates from the Geolocation plugin instead.