

Firebase is one of the most powerful and popular Database as a Service (DBaaS) solutions available today. It provides a document based NoSQL database, with real-time capability, and it is hosted as a service by Firebase so you don’t need to worry about scaling your own servers. Support for Firebase in Ionic 2 has been growing recently, and in this post, we have the community’s resident Firebase + Ionic 2 expert, Jorge Vergara, walking you through how to build your own Firebase application in Ionic 2. Make sure not to miss the bonuses he is offering at the end of this post.
Here’s Jorge…
Do you want to develop an app using Firebase but whenever you start you end up looking at a blank screen without knowing what to do?
I was in that same position a few months ago, I couldn’t understand the docs (or in AngularFire’s case there weren’t any) and I was just staring at the blinking cursor, trying to figure out my first move.
Today I’m going to get you started, I’m going to show you how to set up an Ionic and AngularFire2 project.
As soon as everything is set, we’ll dive into one of the most common things you’ll need to do, CRUD.
You’ll be creating songs and pushing them to a list, you’ll show them in the app’s HomePage, you’ll know how to edit their titles or even just delete them.
So go get your poison (mine is coffee) and get ready to code 🙂
We’re going to break the process in 2 parts, the first will be to handle all configuration and then we’ll create the functionality.
Configure your app
Is your development environment up to date?
Before writing any code, we’re going to make sure everything is up-to-date (about half of the problems people message me about are solved with just installing the updated versions of everything)
The first thing you’ll do is to make sure you have node.js installed, get V6.
The second thing you’ll do is make sure you have Ionic, Cordova and Typescript installed, you’ll do that by opening your terminal and typing:
$ npm install -g ionic cordova typescriptDepending on your operating system (mostly if you run on Linux or Mac) you might have to add sudo before the npm install.... command.
Notice that we’re using ionic this is to access the most up-to-date version of their build tools, we get lighting fast builds + error reporting with colors in our terminal 🙂
Create the App
Now that you made sure everything is installed and up to date, you’ll create a new Ionic 2 app.
Open your terminal, navigate to the folder you want to create it and type:
ionic start af2-lists blankThat means:
ionic startcreates the app.af2-listsis the name we gave it.blanktells the Ionic CLI you want to start with the blank template.
From now on, whenever you are going to type something in the terminal it’s going to be in this folder.
The npm packages that come with the project
When you use the Ionic CLI to create a new project, it’s going to do a lot of things for you, one of those things is making sure your project has the necessary npm packages/modules it needs.
Your package.json file should look like this:
{
  "name": "af2-lists",
  "version": "0.0.1",
  "author": "Ionic Framework",
  "homepage": "http://ionicframework.com/",
  "private": true,
  "scripts": {
    "clean": "ionic-app-scripts clean",
    "build": "ionic-app-scripts build",
    "lint": "ionic-app-scripts lint",
    "ionic:build": "ionic-app-scripts build",
    "ionic:serve": "ionic-app-scripts serve"
  },
  "dependencies": {
    "@angular/common": "5.0.0",
    "@angular/compiler": "5.0.0",
    "@angular/compiler-cli": "5.0.0",
    "@angular/core": "5.0.0",
    "@angular/forms": "5.0.0",
    "@angular/http": "5.0.0",
    "@angular/platform-browser": "5.0.0",
    "@angular/platform-browser-dynamic": "5.0.0",
    "@ionic-native/core": "4.3.3",
    "@ionic-native/splash-screen": "4.3.3",
    "@ionic-native/status-bar": "4.3.3",
    "@ionic/storage": "2.1.3",
    "ionic-angular": "3.9.2",
    "ionicons": "3.0.0",
    "rxjs": "5.5.2",
    "sw-toolbox": "3.6.0",
    "zone.js": "0.8.18"
  },
  "devDependencies": {
    "@ionic/app-scripts": "3.1.0",
    "typescript": "2.4.2"
  },
  "description": "An Ionic project"
}
Install the packages you’ll need
After you make sure that the Ionic CLI started/installed everything correctly, it’s time to install the packages we’ll need for this app.
We need to install AngularFire2, open your terminal (you should already be in the project folder) and install it:
npm install angularfire2 firebaseImport and Initialize
Now you can initialize firebase by going to src/app/app.module.ts and importing everything you need from Firebase:
You can open your app.module.ts and import everything we’ll be using, this is the only time you’ll see this file 🙂
import { NgModule, ErrorHandler } from '@angular/core';
import { IonicApp, IonicModule, IonicErrorHandler } from 'ionic-angular';
import { MyApp } from './app.component';
import { HomePage } from '../pages/home/home';

// Import the AF2 Module
import { AngularFireModule } from 'angularfire2';
import { AngularFireDatabaseModule } from 'angularfire2/database';

// AF2 Settings
export const firebaseConfig = {
  apiKey: 'AIzaSyDnAX0CQbbsMYuOTJ66ox_F0GwzPM4XPXY',
  authDomain: 'angularfire2-list-example.firebaseapp.com',
  databaseURL: 'https://angularfire2-list-example.firebaseio.com',
  storageBucket: '',
  messagingSenderId: '609067141823',
};
And then add the initialize to @NgModule:
@NgModule({
  declarations: [MyApp, HomePage],
  imports: [
    IonicModule.forRoot(MyApp),
    AngularFireModule.initializeApp(firebaseConfig),
    AngularFireDatabaseModle,
  ],
  bootstrap: [IonicApp],
  entryComponents: [MyApp, HomePage],
  providers: [{ provide: ErrorHandler, useClass: IonicErrorHandler }],
})
export class AppModule {}
In the end the file should look like this:
import { NgModule, ErrorHandler } from '@angular/core';
import { IonicApp, IonicModule, IonicErrorHandler } from 'ionic-angular';
import { MyApp } from './app.component';
import { HomePage } from '../pages/home/home';

// Import the AF2 Module
import { AngularFireModule } from 'angularfire2';
import { AngularFireDatabaseModule } from 'angularfire2/database';

// AF2 Settings
export const firebaseConfig = {
  apiKey: 'AIzaSyDnAX0CQbbsMYuOTJ66ox_F0GwzPM4XPXY',
  authDomain: 'angularfire2-list-example.firebaseapp.com',
  databaseURL: 'https://angularfire2-list-example.firebaseio.com',
  storageBucket: '',
  messagingSenderId: '609067141823',
};

@NgModule({
  declarations: [MyApp, HomePage],
  imports: [
    IonicModule.forRoot(MyApp),
    AngularFireModule.initializeApp(firebaseConfig),
    AngularFireDatabaseModule,
  ],
  bootstrap: [IonicApp],
  entryComponents: [MyApp, HomePage],
  providers: [{ provide: ErrorHandler, useClass: IonicErrorHandler }],
})
export class AppModule {}
We are using:
// AF2 Settings
export const firebaseConfig = {
  apiKey: '',
  authDomain: '',
  databaseURL: '',
  storageBucket: '',
  messagingSenderId: '',
};
To store our config object. We then pass it to:
AngularFireModule.initializeApp(firebaseConfig)
Right there your app should be able to run without any errors when you do ionic serve
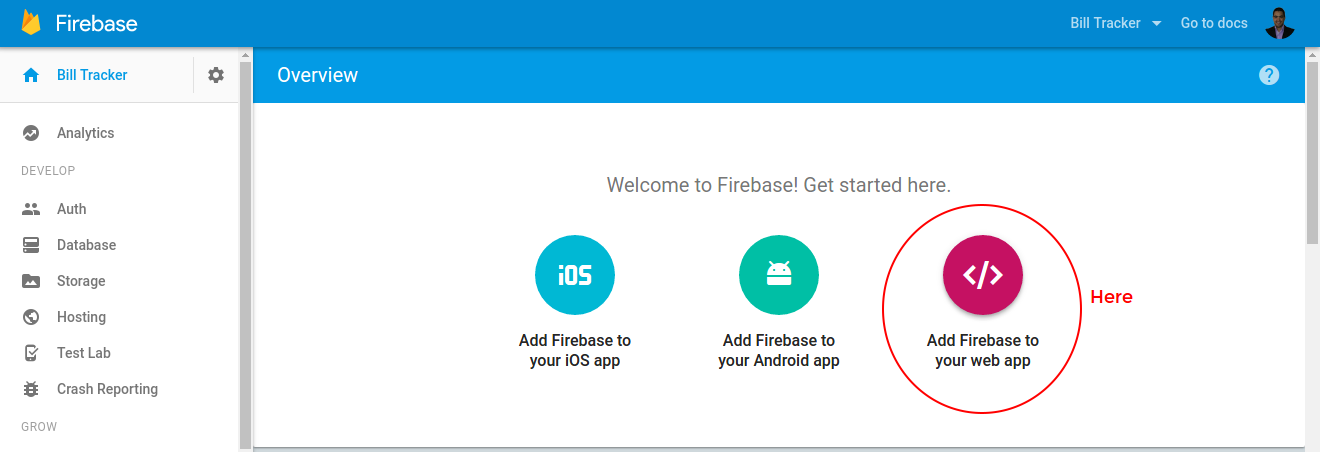
You can find your firebaseConfig data in the Firebase’s Console.
You just go to the console, click on your app (or create a new one) and there it’s going to give you a few choices.
You’ll pick Add Firebase to your webapp because remember we are going to use a mix of AF2 with the JS SDK.
Start adding functionality
Now that we have everything ready we can start coding (a tip for you here, save the project right now in a git repository and then clone it every time you’re starting a new AngularFire2 project, it will make your life easier)
Handling the view
The first thing we’ll do is to build our view (the HTML template) so that we don’t have to edit this file again in the future and you’ll be able to focus on coding.
The file needs 3 things:
- A button to create a new song.
- To show the list of songs stored in Firebase.
- A button to edit/delete songs.
First, we’ll add the button to create new songs, we’ll create a nav-bar button only showing the + sign as an icon.
For this, open home.html and inside the <ion-navbar> just after the <ion-title> you’ll add:
<ion-buttons end>
  <button ion-button icon-only (click)="addSong()">
    <ion-icon name="add"></ion-icon>
  </button>
</ion-buttons>
Let’s review that snippet:
- It’s adding the button to the end (that means it’ll add it to the right side of the screen).
- It’s using the
iconcalledaddwhich is just a plus sign. - When clicked is calling the
addSong()method (which we’ll create in thehome.tsfile later).
Now we’ll show the list of songs in the view, for that add this inside the <ion-content> tag:
<ion-list>
  <ion-item *ngFor="let song of songs | async"> {{song.title}} </ion-item>
</ion-list>
That snippet will create a list and populated with all the songs it finds in the songs array, we’ll create it next.
It’s also using the async pipe, because AngularFire2 returns Observables, which means it’s going to be retrieving the list items and sending them to the view as soon as they become available.
And now we just need to add a way to edit/remove the songs in the list, for that, we’ll add a click handler to the <ion-item> tag:
<ion-item
  *ngFor="let song of songs | async"
  (click)="showOptions(song.id, song.title)"
></ion-item>
That click handler is calling our function showOptions() and passing the song’s title and id (this is going to display an action sheet).
It’s coding time
Now we’re going to move to home.ts and we’ll start building all the functionality for the view we just created.
Remember we need to accomplish 4 things here:
- List all the songs in the view.
- Create new songs.
- Update a song’s title.
- Delete a song from our list.
First, we’ll create the song list that we’ll pass to the view, for that we’ll need to do a few things:
Import AngularFire2 and the list observable:
import { AngularFireDatabase, AngularFireList } from 'angularfire2/database';Then create the songs variable right before the constructor:
songs: AngularFireList<any>;Now we’ll inject AngularFire2 in our constructor and initialize the songs variable.
constructor(public navCtrl: NavController, afDatabase: AngularFireDatabase) {
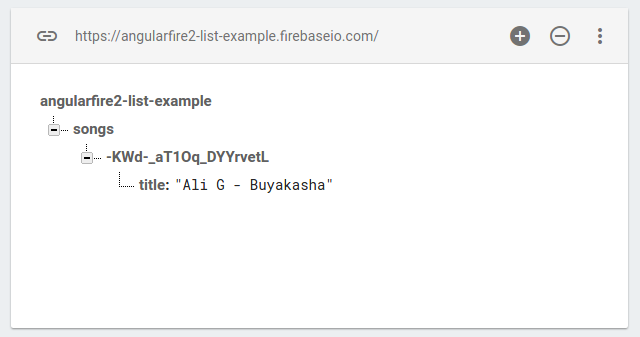
this.songs = afDatabase.list('/songs').valueChanges();
}We’re creating a database reference that listens to the songs node inside our Firebase database. It’s already synced to our app, so if you open your Firebase console and create a record there it will show up in your HomePage.

It’s also using Firebase real-time bindings, so you won’t have to refresh the view to notice changes to any of the songs.
Now it’s time for us to test that, for that, we’ll build a function that will allow us to create new songs and push them to the list.
There are times where you need a separate page/view with the creation form, but since it was just a song title we’re going to create a prompt so the user can just add the name without moving to a different page.
First, we’ll import the controller for alert prompts.
import { NavController, AlertController } from 'ionic-angular';Now, we need to inject it to the constructor:
constructor(public navCtrl: NavController, public alertCtrl: AlertController,
  afDatabase: AngularFire) {...}
We can now create the function, remember how we named it in the home.html file?
addSong(){
  let prompt = this.alertCtrl.create({
    title: 'Song Name',
    message: "Enter a name for this new song you're so keen on adding",
    inputs: [
      {
        name: 'title',
        placeholder: 'Title'
      },
    ],
    buttons: [
      {
        text: 'Cancel',
        handler: data => {
          console.log('Cancel clicked');
        }
      },
      {
        text: 'Save',
        handler: data => {
          const newSongRef = this.songs.push({});

          newSongRef.set({
            id: newSongRef.key
            title: data.title
          });
        }
      }
    ]
  });
  prompt.present();
}
I hope that code isn’t weird or anything, it’s just the basic alert code, pay attention to this bit:
{
  text: 'Save',
  handler: data => {
    const newSongRef = this.songs.push({});

    newSongRef.set({
      id: newSongRef.key
      title: data.title
    });
  }
}
That right there is taking the song title we just add and pushing it to the database.
Firebase we’ll create the object for you, and it will assign it a unique ID without you doing anything else.
You can now create objects and push them to Firebase’s real-time database, how cool is that!?
We now need a way to delete/update our songs, for that we’ll create an action sheet, basically when you click on a song we want it to display 3 options, remove, edit and Cancel.
To create an action sheet you’ll need to first import the controller, go ahead and do that:
import {
  NavController,
  AlertController,
  ActionSheetController,
} from 'ionic-angular';
Now, just like with the AlertController we need to inject it in the constructor:
constructor(public navCtrl: NavController, public alertCtrl: AlertController,
  afDatabase: AngularFire, public actionSheetCtrl: ActionSheetController) {...}
Now we want to bind it to the showOptions() function we created on the home.html file:
showOptions(songId, songTitle) {
  let actionSheet = this.actionSheetCtrl.create({
    title: 'What do you want to do?',
    buttons: [
      {
        text: 'Delete Song',
        role: 'destructive',
        handler: () => {
          this.removeSong(songId);
        }
      },{
        text: 'Update title',
        handler: () => {
          this.updateSong(songId, songTitle);
        }
      },{
        text: 'Cancel',
        role: 'cancel',
        handler: () => {
          console.log('Cancel clicked');
        }
      }
    ]
  });
  actionSheet.present();
}
The function is receiving the song’s id and title as parameters, and then it’s going to use them to pass them to the delete and the update functions.
The first part is passing the song’s ID to the delete function:
{
  text: 'Delete Song',
  role: 'destructive',
  handler: () => {
    this.removeSong(songId);
  }
}
Go ahead and create that removeSong() function:
removeSong(songId: string){
  this.songs.remove(songId);
}
That simple code .remove() will go to the list, find the correct song and then return a promise, so you can use a .then() if you want to perform another action after deleting.
The next part of the action sheet code:
{
  text: 'Update title',
  handler: () => {
    this.updateSong(songId, songTitle);
  }
}
Will take the song’s ID and title and pass it to an updateSong() function, we’ll create it right now:
updateSong(songId, songTitle){
  let prompt = this.alertCtrl.create({
    title: 'Song Name',
    message: "Update the name for this song",
    inputs: [
      {
        name: 'title',
        placeholder: 'Title',
        value: songTitle
      },
    ],
    buttons: [
      {
        text: 'Cancel',
        handler: data => {
          console.log('Cancel clicked');
        }
      },
      {
        text: 'Save',
        handler: data => {
          this.songs.update(songId, {
            title: data.title
          });
        }
      }
    ]
  });
  prompt.present();
}
Notice something similar about it?
It’s basically the same as the addSong() function with 2 small differences:
- On the input object, we’re adding a value property and passing it the current name:
inputs: [
  {
    name: 'title',
    placeholder: 'Title',
    value: songTitle
  },
],
And in the handler object we’re passing the new song’s name with its ID to an .update() function:
{
  text: 'Save',
  handler: data => {
    this.songs.update(songId, {
      title: data.title
    });
  }
}
That function will find the correct song and update its name.
The coolest thing about AngularFire2 is that if you’ve been paying attention and building the app alongside with me, you’ve noticed your songs updating in real-time, without you needing to do anything else 🙂
Conclusion
By now you should have a fully working Ionic + AngularFire2 app, we:
- Made sure everything was up-to-date.
- Created the app and set up all the config.
- Created the HTML template.
- Added the CRUD functions to our TypeScript file.
The next thing you should do is to get familiar with Firebase as a whole, to build more complex apps.
I created a little bonus to help you achieve just that 🙂
You’ll get:
- A free Crash Course where you’ll work at your own pace and build a complete Firebase powered Ionic App.
- 20% discount for my book Building Firebase Powered Ionic Apps.