

One of the cool things about CouchDB is how portable it is. It can run just about anywhere and interact with other CouchDB style databases anywhere. Any database that speaks the CouchDB Replication Protocol will be able to interact with any other database that does the same.
This is why we can use libraries like PouchDB with our mobile applications to store data locally, that can then sync to a CouchDB database hosted on a server somewhere, or even to a DBaaS (Database as a Service) like Cloudant. These are all different implementations, but they can all speak to each other using the CouchDB Replication Protocol to take advantage of the features CouchDB offers.
Having said that, you would think spinning up a CouchDB database somewhere would be a piece of cake. Unfortunately, it can be quite confusing. As far as I can tell, the only production quality DBaaS for CouchDB is Cloudant, which allows you to get up and running extremely quickly and without having to do much configuration yourself.
I have used Cloudant many times in the past, and would generally recommend it to people – especially beginners. However, it’s far from my favourite service that I have ever used. The interface (mostly the IBM account management interface) is confusing, clunky, and sometimes buggy. I’ve experienced a couple of instances of unexplained downtime or errors and support can be difficult to get in contact with. Also, once you require more than the free tier it quickly becomes quite expensive.
Overall, the quality of the service is acceptable and I have no issue with continuing to use it, but it does leave me wanting an easier option to take control of my CouchDB database. Services like Cloudant are extremely convenient, but it does put you in a situation where you have to put your trust in a 3rd party to control critical infrastructure.
Another benefit of CouchDB is that, should you choose to move your database somewhere else, it is extremely easy to do thanks to the replication protocol. Therefore, choosing any particular CouchDB style backend is not that critical of a decision, given that you can easily move to any other type of CouchDB database later.
In this tutorial, we are going to walk through how you can set up your own CouchDB database on an Ubuntu server hosted with Digital Ocean. Most of the steps in this tutorial will be applicable to installing CouchDB in many different server environments.
Creating a Droplet with Digital Ocean
Digital Ocean allows you to easily create Virtual Private Servers (VPS) called “Droplets”. A VPS behaves in a similar manner to you owning your own server – you have complete control over the server and can install and run whatever you like on it.
To get started, you will need to create an account with Digital Ocean. This is my referral link, if you use this to sign up you will get $10 credit, and I’ll also get some credit if you continue to use the service.
Once you have an account, click the Create button at the top right, and then choose Droplets. You will see a screen like this:
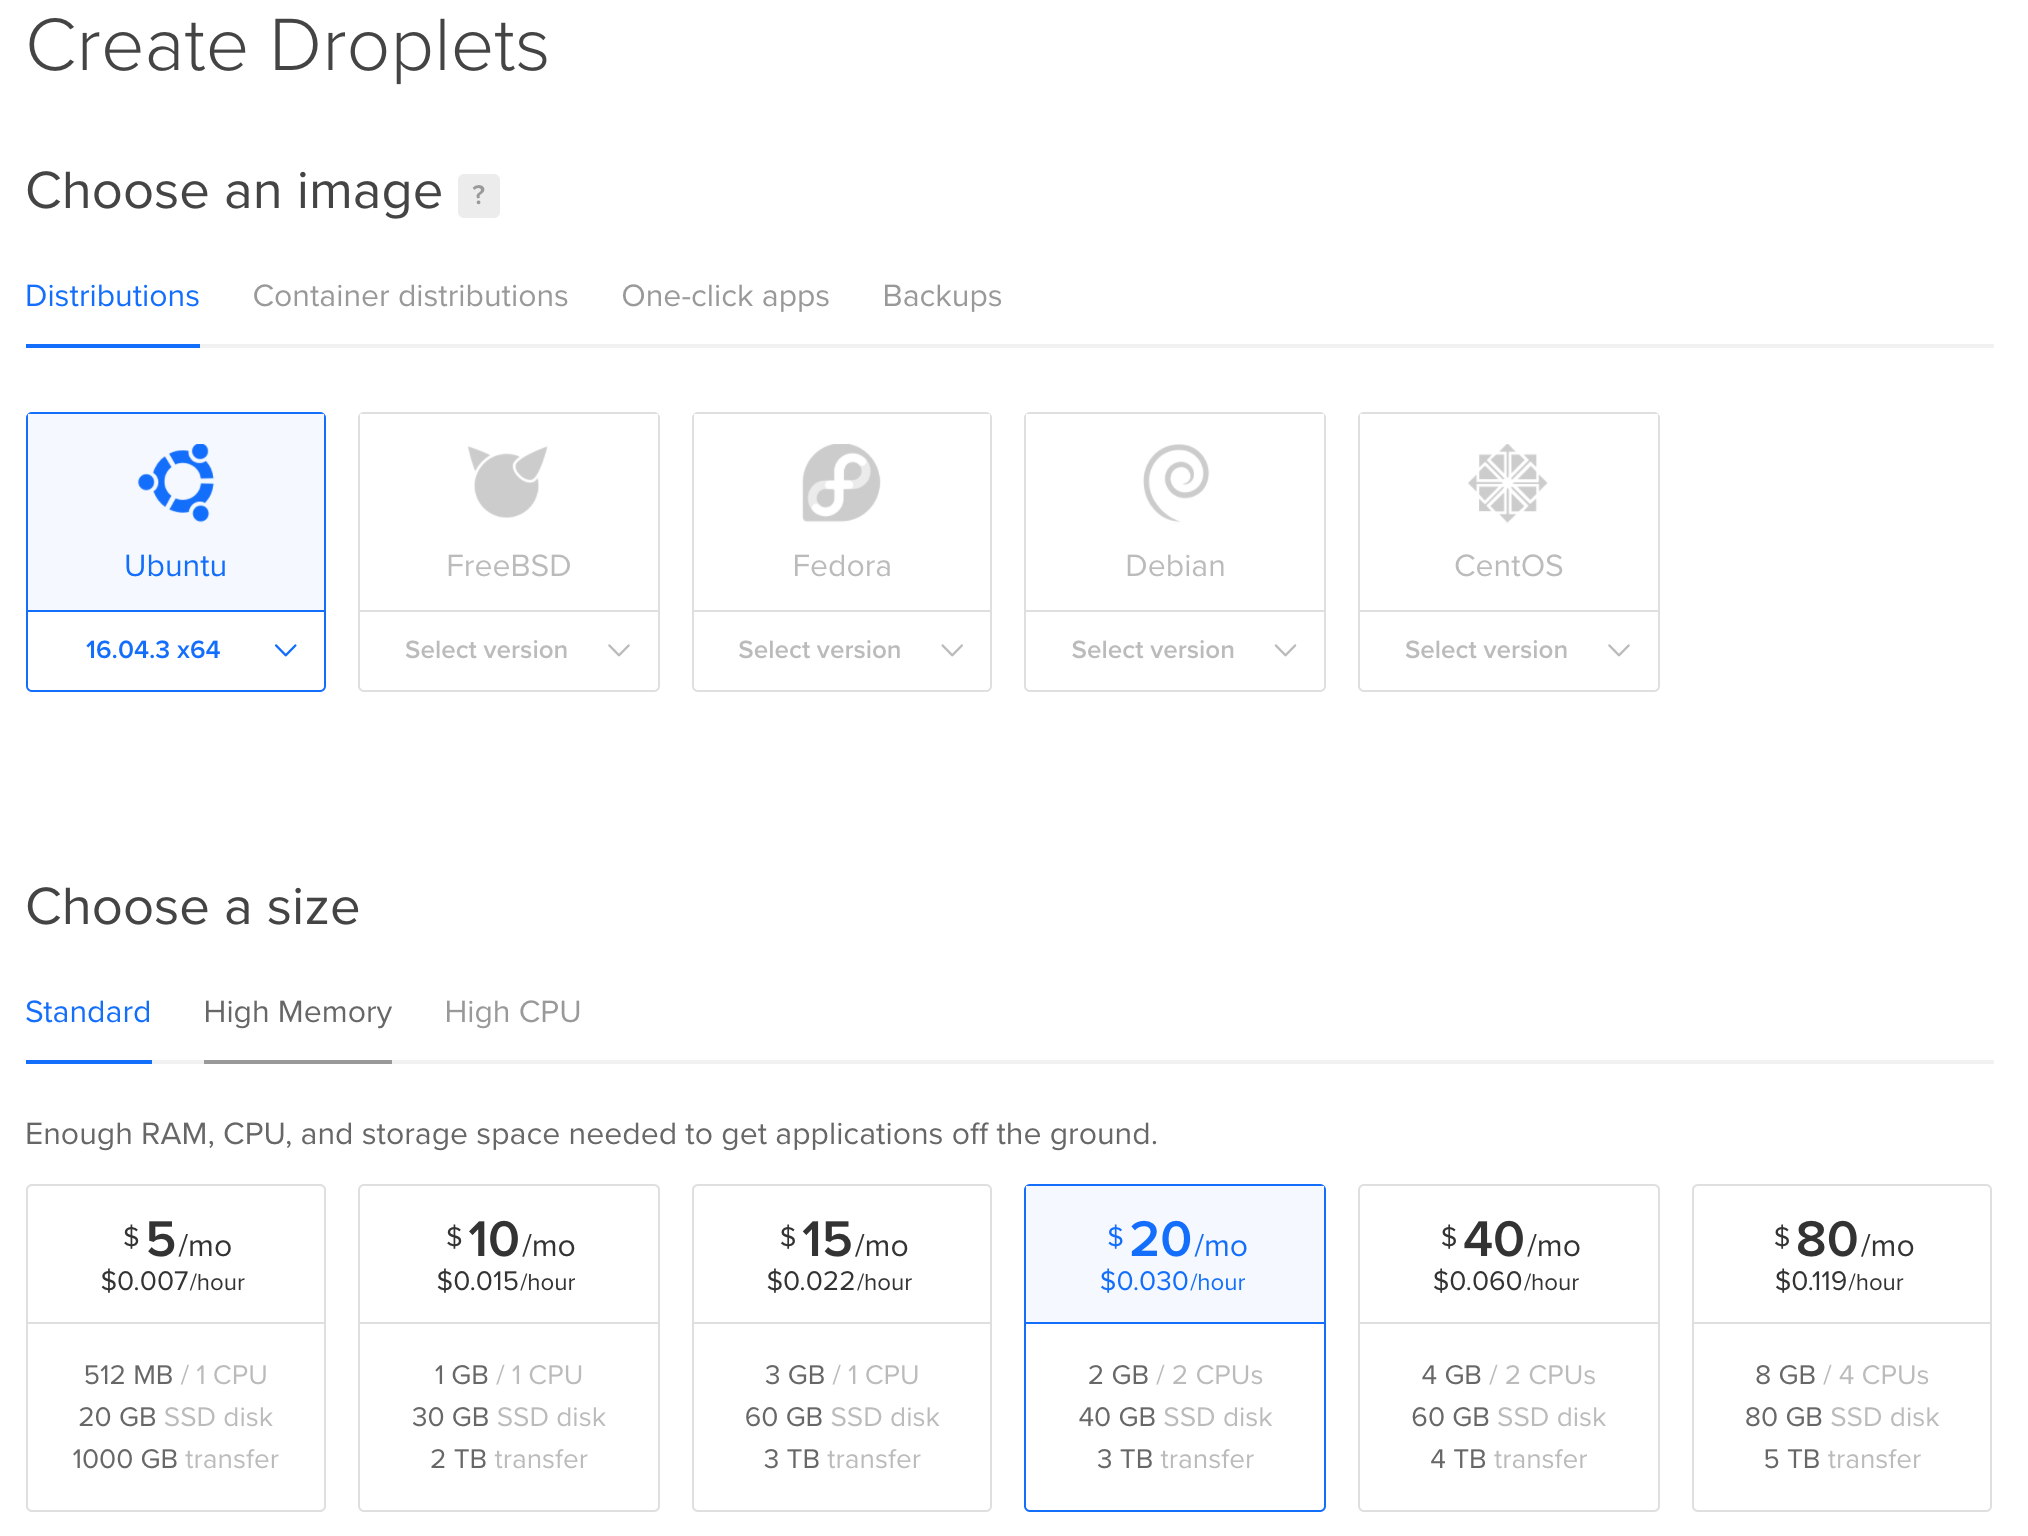
As you can see, you can choose between various operating systems and server configurations. We will be using Ubuntu 16.04.3 x64 – this may change in future, so just choose whatever the default version of Ubuntu is at the time. The size you choose for your server will depend on how much you intend to do with it. To get started with, I will be choosing the $10/mo option.
You can just accept the default datacenter region unless you would prefer to change it to something more local to your users. You should enable the IPv6 option and you may also want to enable Backups (this does add to the cost). You should also add your SSH key, or create one. It is much more secure (and easier) to login via a public/private key pair than it is to use a root password. If you do not add an SSH key, you will be emailed a root password to log in with (which you should change immediately).
Once you have finalised your options, click Create.
SSH Into the Server
Once your Droplet has finished setting up, you will need to log into your server. You can do that by launching a new terminal window and running the following command:
ssh root@IP_ADDRESS_HEREYou will find the IP Address for your server in the Droplets interface on Digital Ocean. Once you have logged in via SSH, you should make sure to apply any available updates by running the following commands:
apt-get update
apt-get upgrade
You should also consider other security precautions like disabling the root login and creating a sudo user. This is important, but I won’t be covering it in this tutorial. You should take a look at this guide for some advice on basic security precautions.
Configuring the Firewall
One important security measure is setting up a firewall, and I want to discuss that here because it is going to cause some issues for our CouchDB installation.
You should first enable the Firewall by following the instructions in the guide I linked above. By default, this will not allow connections over ports 5984 and 6984 which is what we need for CouchDB. To open these ports, you should run the following commands:
sudo ufw allow 5984sudo ufw allow 6984To allow for traffic over HTTP, you will also need to enable port 80 – this will be required as part of the verification process if you intend to set up SSL later:
sudo ufw allow 80If you were to run sudo ufw status now, you should see the following rules:
Status: active

To                         Action      From
--                         ------      ----
OpenSSH                    ALLOW       Anywhere
5984                       ALLOW       Anywhere
6984                       ALLOW       Anywhere
80                         ALLOW       Anywhere
OpenSSH (v6)               ALLOW       Anywhere (v6)
5984 (v6)                  ALLOW       Anywhere (v6)
6984 (v6)                  ALLOW       Anywhere (v6)
80 (v6)                    ALLOW       Anywhere (v6)
Now we can move on to installing CouchDB.
Installing CouchDB
The way in which you install CouchDB will depend on the server environment you have set up. You can take a look at the CouchDB Documentation for instructions on other operating systems.
For the Ubuntu environment, we are working with, we will first need to run the following command:
echo "deb https://apache.bintray.com/couchdb-deb xenial main" | sudo tee -a /etc/apt/sources.listand then:
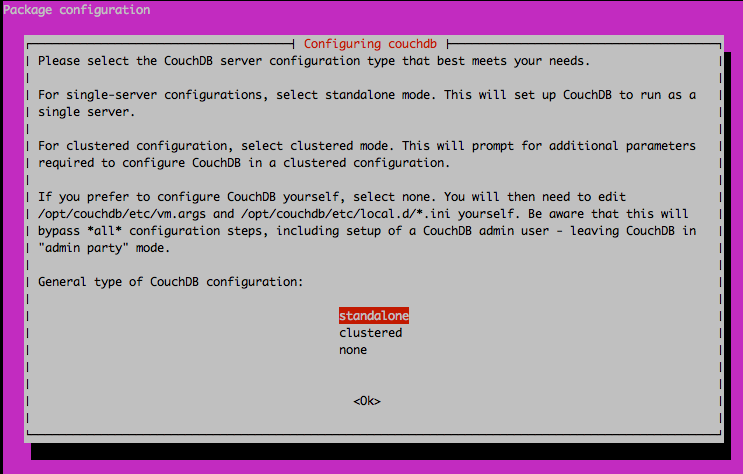
sudo apt-get update && sudo apt-get install couchdbFollow the prompts, and when you come to the configuration screen, you should choose standalone:
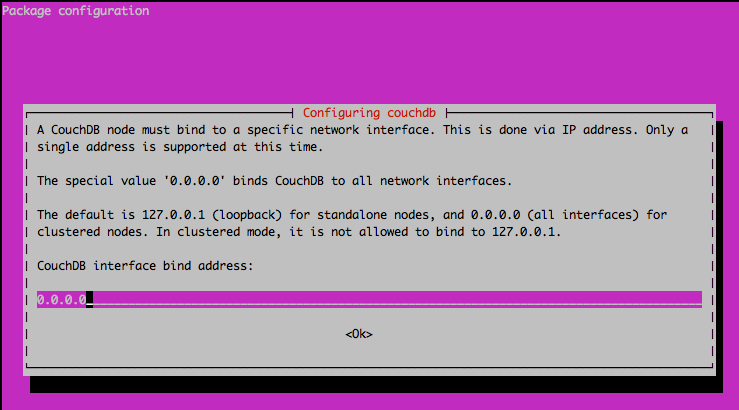
The next screen will ask you what you want the CouchDB interface bind address to be. By default, this is 127.0.0.1, but if you want it to be publicly accessible you need to change the bind address to 0.0.0.0:
Next, it will ask you to create a password for the CouchDB admin user. It is important that you do this, otherwise all users will be treated as administrators (also known as the “admin party”).
Once you have completed this step, the installation will finish up. Once it has completed, you should be able to go to the following URL:
http://IP_ADDRESS_HERE:5984/and you will set output from your CouchDB database:
{"couchdb":"Welcome","version":"2.1.1","features":["scheduler"],"vendor":{"name":"The Apache Software Foundation"}}you can also go to:
http://IP_ADDRESS_HERE:5984/_utils/to view Fauxton, which is the management interface for CouchDB. You will need to log in with the admin user you just created.
Enabling SSL for CouchDB
Although it is not technically required, it is a good idea to set up SSL on your CouchDB installation – especially if you are using the database for production purposes. Without SSL, traffic going to and from your database could be intercepted and read by anybody.
Set up a Domain Name
In order to enable SSL, you will need to have a domain name associated with your Droplet rather than just an IP Address. To do this, you will first need to purchase a domain name wherever you like.
To attach a domain name, you will need to click on the Networking tab in the Digital Ocean interface.
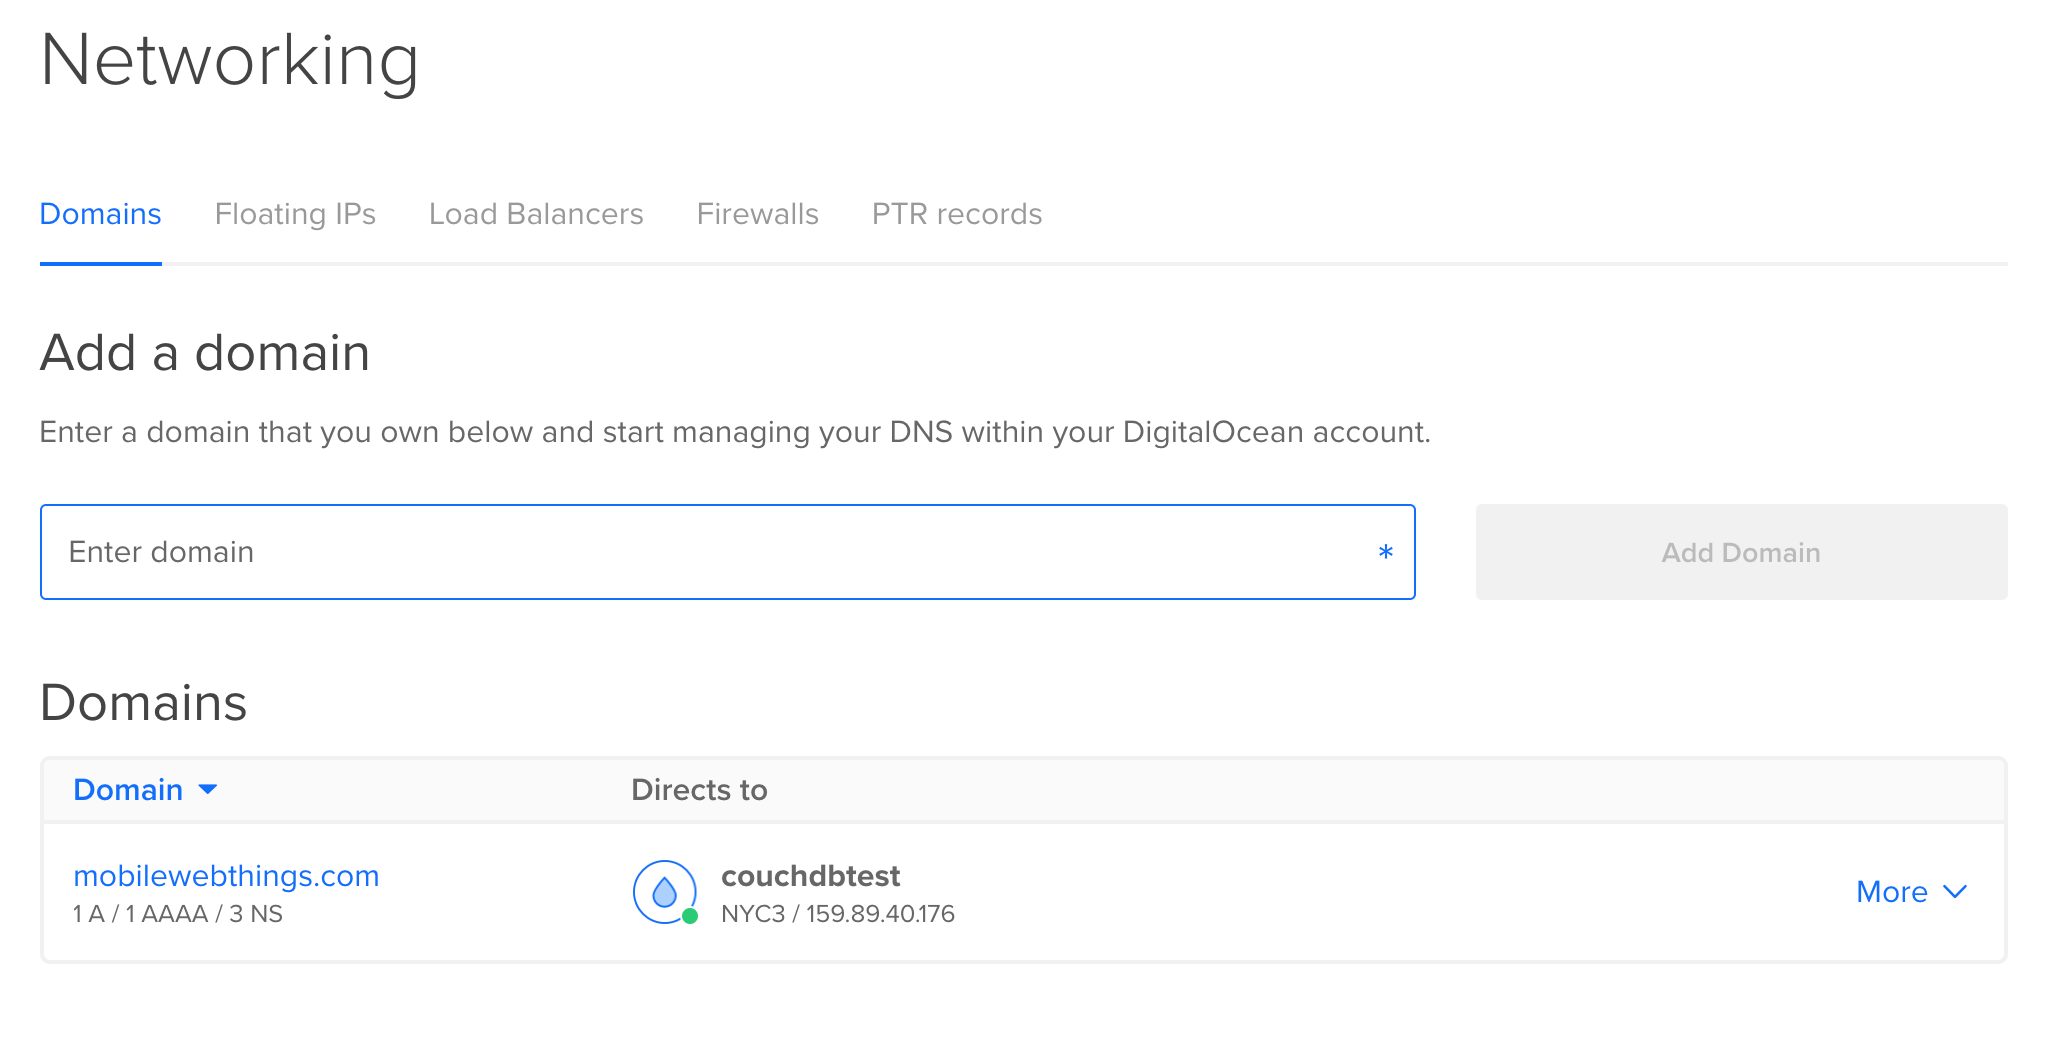
You will need to supply your domain name and associate it with the Droplet you created. Make sure that you have an A record that points to your IP Address, and an AAAA record that points to your IPv6 Address.
You will also need to update the Name Servers of the domain name you purchased to point to Digital Ocean:
ns1.digitalocean.comns2.digitalocean.comns3.digitalocean.comOnce you have completed these steps, and remember that it may take some time for the DNS records to propagate, you should be able to access your CouchDB database using your domain name:
http://YOURDOMAINNAME.com:5984/_utilsCreate an SSL Certificate with Let’s Encrypt/Certbot
Now that we have a domain name, we will need to set up an SSL certificate for it and configure that SSL certificate for our CouchDB installation.
We will be using Let’s Encrypt and Certbot which will allow us to create an SSL certificate for free. We will install Certbot on our server which will be able to create certificates for us and renew them.
Again, the exact steps will depend on the server environment you have set up. For our environment, we will need to perform the following steps:
sudo apt-get update
sudo apt-get install software-properties-common
sudo add-apt-repository ppa:certbot/certbot
sudo apt-get update
sudo apt-get install python-certbot-apache
We will deviate from the normal steps here because we do not want to have Certbot automatically configure the SSL certificate for Apache us because we want to set it up on CouchDB.
We are going to create a folder under CouchDB to hold our Let’s Encrypt files:
sudo mkdir /opt/couchdb/letsencryptThen we will create the certificate using the following command:
sudo certbot certonly --webroot -w /var/www/html --config-dir /opt/couchdb/letsencrypt --logs-dir /var/log/couchdb -d YOUR_DOMAIN_NAME.comIMPORTANT: Make sure to replace YOUR_DOMAIN_NAME.com with your own domain name.
This command will prompt you to enter some information, make sure to enter the appropriate information. If everything goes successfully, you should see a message like this:
IMPORTANT NOTES:
 - Congratulations! Your certificate and chain have been saved at:
   /opt/couchdb/letsencrypt/live/YOUR_DOMAIN_NAME.com/fullchain.pem
   Your key file has been saved at:
   /opt/couchdb/letsencrypt/live/YOUR_DOMAIN_NAME.com/privkey.pem
   Your cert will expire on '2018-04-16'. To obtain a new or tweaked
   version of this certificate in the future, simply run certbot
   again. To non-interactively renew *all* of your certificates, run
   "certbot renew"
To test the renew functionality, you can run the following command:
sudo certbot renew --dry-runThe .pem files that Certbot created are what we will need to associate with our CouchDB installation. It is important that these files are owned by the couchdb user, and that the permissions are set so that no other users can access these files.
To do that, we will first set the permissions on the files to the following:
sudo chmod 600 /opt/couchdb/letsencrypt/live/YOUR_DOMAIN_NAME.com/cert.pem
sudo chmod 600 /opt/couchdb/letsencrypt/live/YOUR_DOMAIN_NAME.com/privkey.pem
sudo chmod 600 /opt/couchdb/letsencrypt/live/YOUR_DOMAIN_NAME.com/fullchain.pem
We can set the CouchDB as the owner of these files with the following command:
sudo chown -R couchdb /opt/couchdb/letsencrypt/Set up the Certificate in CouchDB
We have our SSL certificate, now we just need to set it up in the configuration files for CouchDB. To do that, you will need to modify the local.ini file:
sudo nano /opt/couchdb/etc/local.iniYou will need to modify the following entries:
[daemons]
; enable SSL support by uncommenting the following line and supply the PEM's below.
; the default ssl port CouchDB listens on is 6984
httpsd = {chttpd, start_link, [https]}
Uncommenting this line will enable SSL.
[ssl]
port = 6984
cert_file = /opt/couchdb/letsencrypt/live/YOUR_DOMAIN_NAME.com/cert.pem
key_file = /opt/couchdb/letsencrypt/live/YOUR_DOMAIN_NAME.com/privkey.pem
cacert_file = /opt/couchdb/letsencrypt/live/YOUR_DOMAIN_NAME.com/fullchain.pem
This will associate the certificate we created with the CouchDB installation. Once you have made these changes, you should restart the CouchDB service:
/etc/init.d/couchdb restartYou should now be able to access your CouchDB installation over HTTPS on port 6984:
https://mobilewebthings.com:6984/and you can access Fauxton at:
https://mobilewebthings.com:6984/_utilsIf you like, you can stop accepting traffic over port 80 by blocking it in ufw:
sudo ufw deny 80and you can also make CouchDB inaccessible over HTTP by blocking port 5984:
sudo ufw deny 5984Summary
There are a few extra steps involved in setting up your own CouchDB database, and maintaining the infrastructure becomes your responsibility, but there are certainly benefits to taking control into your own hands.