

Most of the changes required for upgrading from Ionic 3 to Ionic 4 are going to be simple find and replace style changes – things like changing <button> to <ion-button> and ionViewDidLoad() to ngOnInit(). Although it will look slightly different, the code that you are using in Ionic 3 will more or less look the same in Ionic 4.
The most significant change, and one that may require a little more thought is the move to Angular routing. The recommended approach moving forward for Ionic/Angular applications will be to use the Angular routing system to define the navigation in the application. If you are not already familiar with using Angular routing in Ionic 4 I would recommend reading these articles first for a bit of background:
- Using Angular Routing with Ionic 4
- Implementing a Master Detail Pattern in Ionic 4 with Angular Routing
Keep in mind that although push/pop style navigation is still technically available through the use of Ionic’s web components, it will be much easier to use Angular routing with an Ionic 4 application. There are also other significant benefits to using Angular routing:
- You need to use Angular routing in Ionic 4 in order to enable lazy loading (
@IonicPageis no longer available) - Having routes defined with the Angular router makes the application much more usable in a web/PWA environment
In this tutorial, we are going to look at a hypothetical scenario of creating routes for an existing Ionic 3 application. We will consider an application with a typical structure, and discuss how to create the routes for the application in Ionic 4, and how navigation would need to be modified.
What is Angular Routing?
I intend to keep this tutorial reasonably high level, so if you are not already familiar with Angular routing in a general sense, I would recommend reading the two articles I linked above. At its core, a route is responsible for indicating which component in your application needs to be activated. The active route is determined by whatever path is present in the URL.
In our application we will have some routes defined as follows (e.g. in a app-routing.module.ts file):
import { NgModule } from '@angular/core';
import { RouterModule, Routes } from '@angular/router';

const routes: Routes = [
  { path: '', redirectTo: '/home', pathMatch: 'full' },
  { path: 'home', loadChildren: './pages/home/home.module#HomeModule' },
  { path: 'about', loadChildren: './pages/about/about.module#AboutModule' },
];
@NgModule({
  imports: [RouterModule.forRoot(routes)],
  exports: [RouterModule],
})
export class AppRoutingModule {}
This is just a simple application that has two pages. In the case that no path is supplied in the URL, e.g:
http://localhost:8100/The first route will be matched, which simply redirects to the home route. The home route would also be activated by going to:
http://localhost:8100/homeand the about route could be activated by going to:
http://localhost:8100/aboutEach route will have an associated component (i.e. the page in your application) that will be displayed when the route is activated. Since we will generally be using lazy loading, we use the loadChildren property instead of component because we want to load the pages module file rather than the page component itself.
In an Ionic/Angular application, whatever route is activated will display the associated page/component inside of:
<ion-router-outlet></ion-router-outlet>which you will find in the root component’s template (app.component.html). Although there is more you can do with routes, that’s pretty much the gist of it – you link URL paths to specific components. Navigation in the application is achieved by switching between these URL paths.
Setting up the Routes
Technically, it doesn’t matter how you structure your routes or what you call them. You could name all of your routes like this:
const routes: Routes = [
  { path: '', redirectTo: '/a', pathMatch: 'full' },
  { path: 'a', loadChildren: './pages/home/home.module#HomeModule' },
  { path: 'b', loadChildren: './pages/about/about.module#AboutModule' },
  { path: 'c', loadChildren: './pages/detail/detail.module#DetailModule' },
];
and it would work just fine. As long as each page you want to switch to has a route you will be able to navigate to it. This isn’t a very nice or organised way to do it, though. We should take the time to give our application a sensical route structure so that the application is easier to develop and maintain, and so that it is more useful to users.
It helps to have a big picture understanding of the structure of your application. The example we are going to walk through will look like this:
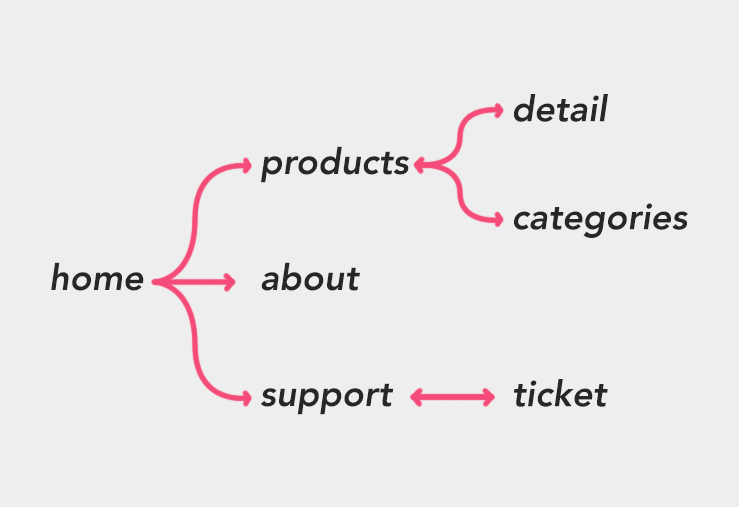
We have a home page that will serve as a sort of “welcome” splash page. We then have three main pages which are products, about, and support. The products page will also be able to activate a detail page and a category page. The support page will be able to launch the ticket page as a modal.
As I mentioned, each page we want to display in the router needs its own route, so each of the pages in the diagram above should have its own route. Since we are going to be launching the ticket page as a modal from the support page, we will not be creating a route for it.
Given the structure of the diagram, at first glance you might visualise the paths for the routes like this:
/home
/home/products
/home/products/detail
/home/products/categories
/home/about
/home/support
You certainly could do that if you wanted, but the home in every URL is a bit redundant. We might then change it to this instead:
/home
/products
/products/detail
/products/categories
/about
/support
This is pretty good, but since our detail page is going to display details for specific products, we are going to pass the id of the product to the detail page. Instead of having a static route we would change it to accept a parameter:
/home
/products
/products/:id
/products/categories
/about
/support
or if you prefer:
/home
/products
/products/detail/:id
/products/categories
/about
/support
Again, if you are unfamiliar with the use of :id here, I would recommend reading the tutorial I linked above. We now have our routes, and I think that they are well structured and make sense. It is important to remember that there is no specific structure you have to follow. If I decided I didn’t like the way those routes looked I could just as easily do this:
/home
/detail/:id
/products
/categories
/about
/support
I’m just of the opinion that it makes sense for your routes to follow the structure of your application. Especially for larger applications, a sensical hierarchical route structure is going to be easier to reason about. For smaller applications with just a few different routes, it probably isn’t going to really matter.
Now, to complete the final step and implement those routes in our app-routing.module.ts file, they would look like this:
const routes: Routes = [
  { path: '', redirectTo: '/home', pathMatch: 'full' },
  { path: 'home', loadChildren: './pages/home/home.module#HomeModule' },
  {
    path: 'products',
    loadChildren: './pages/products/products.module#ProductsModule',
  },
  {
    path: 'products/:id',
    loadChildren:
      './pages/product-detail/product-detail.module#ProductDetailModule',
  },
  {
    path: 'products/categories',
    loadChildren:
      './pages/product-categories/product-categories.module#ProductCategoriesModule',
  },
  { path: 'about', loadChildren: './pages/about/about.module#AboutModule' },
  {
    path: 'support',
    loadChildren: './pages/support/support.module#SupportModule',
  },
];
With the routes in place, we have everything we need to navigate about the application.
Navigating the Routes
Let’s think about the structure we created in terms of navigating an Ionic 3 application:
Since we have a home page that will serve as a welcome page, this would be our initial root page. Once the user is done with this page, we would use setRoot to change the root page to the products page. We would switch between the products/about/support pages by calling setRoot. If we wanted to view the detail or categories pages, we would use push to push those pages onto the navigation stack. In the case of the ticket page, in this example, we would launch that as a modal from the support page.
In Ionic 4 with Angular routing, there is no root page to be defined. Our default route will be activated and the associated page/component will be displayed, which in this case would be the home page. Now let’s consider how we would navigate about the application using routes, compared to how we would do it in an Ionic 3 application.
setRoot
In Ionic 3, we would navigate to our products, support, or about pages by using setRoot on the NavController. In Ionic 4 with Angular routing we would simply link to the page from the template using routerLink:
<ion-button routerLink="/support" routerDirection="root"></ion-button>or if we wanted to trigger that programmatically, we would link to the appropriate URL using the navigateRoot method of NavController:
this.navCtrl.navigateRoot('/support');Notice that in the routerLink example, we also specify the routerDirection. This isn’t strictly required, but it helps with the page transition animations. Since we are just linking to various routes it can be hard for the router outlet to determine the “direction” of the navigation is (i.e. are we navigating “backward” or “forward”?). This will make sure the correct page transition animation is applied. This is also the reason that we use Ionic’s own navigation method of navigateRoot rather than just using the Angular router directly because it allows us to specify the intent of the navigation so that the appropriate animation can be applied.
NOTE: The methods we will be using like navigateRoot are available on a new version of the NavController. This isn’t to be confused with the existing NavController in Ionic 3.
Push
Where we would “push” pages like the detail page or the categories page in Ionic 3, with Ionic 4 and Angular routing we still just link to the route as usual using routerLink:
<ion-button routerLink="/products/12" routerDirection="forward"></ion-button>However, this time we supply a routerDirection of forward. When we are transitioning from the products page to the product-detail page, we are traversing forward through our applications structure.
If we wanted to perform the navigation programmatically, we would do this:
this.navCtrl.navigateForward('/products/12');When pushing pages in Ionic 3, especially when pushing detail pages like this, we would also often supply an object to the pushed page through NavParams (e.g. the product that we want to display). When using Angular routing, any information we want to pass from one page to the next needs to be supplied through the URL. Whilst it is possible to send large amounts of information through the URL, it isn’t entirely practical to send entire objects as a JSON string through the URL.
Instead, we would just pass something simple like an id (12 in this example) that we can retrieve on the next page, and then use a service to grab the rest of the details for that particular object. For more details on how to implement this master/detail pattern in Ionic 4, I recommend reading: Implementing a Master/Detail Pattern in Ionic 4.
Pop
Once again, navigating backward is a case of linking to the appropriate route and specifying the direction:
<ion-button routerLink="/products" routerDirection="backward"></ion-button>However, with backward navigation, you will commonly use Ionic’s back button component to do this. In that case, all you need to do is add the component to your template:
<ion-back-button defaultHref="/products"></ion-back-button>This will automatically navigate back to the previous page. However, in the case that the user navigates directly to a particular URL, there will be no history information and the back button won’t know where to navigate back to. This is why we supply the defaultHref, if there is no history information then this is the route that will be navigated to.
Of course, you can also navigate backwards programatically:
this.navCtrl.navigateBack('/products');Modal
We’ve covered all the basic navigation methods, but what about our ticket modal? In this case, we want to be able to launch the ticket page as a modal from the support page. In this case, we can just import the component we want to launch as a modal:
import { TicketPage } from '../ticket/ticket.page';and then use Ionic’s ModalController to launch that component as a modal:
this.modalCtrl
  .create({
    component: TicketPage,
  })
  .then((modal) => {
    modal.present();
  });
Inside of the ticket page, to dismiss the modal once you are done you just need to call dismiss on the ModalController:
this.modalCtrl.dismiss();Unlike transitioning between normal pages, it is possible to pass data objects through to a component launched as a modal by using componentProps and NavParams.
Summary
Once you have the routes figured out, it isn’t too much fuss to actually change the navigation in your application. For the most part, it’s just a matter of swapping our your push/pop/setRoot calls with the methods that I have outlined above. Likely the most time-consuming aspect people will run into is having to refactor the code to have services return information to detail pages, rather than passing the objects directly to the page using NavParams.