

Puzzle games are all the rage on the mobile app stores, with the most notable being the absolute giant that is Candy Crush. Puzzle games are usually pretty casual games, but they have mass appeal right through from the most hardcore gamers to your friends mother who doesn’t know how to send emails.
I recently wrote a tutorial on how to build a Candy Crush / Bejeweled style game in Phaser and now we are going to create another puzzle game. This game will be a word searching game, where you have to make as many words as you can from the letters available, like Ruzzle.
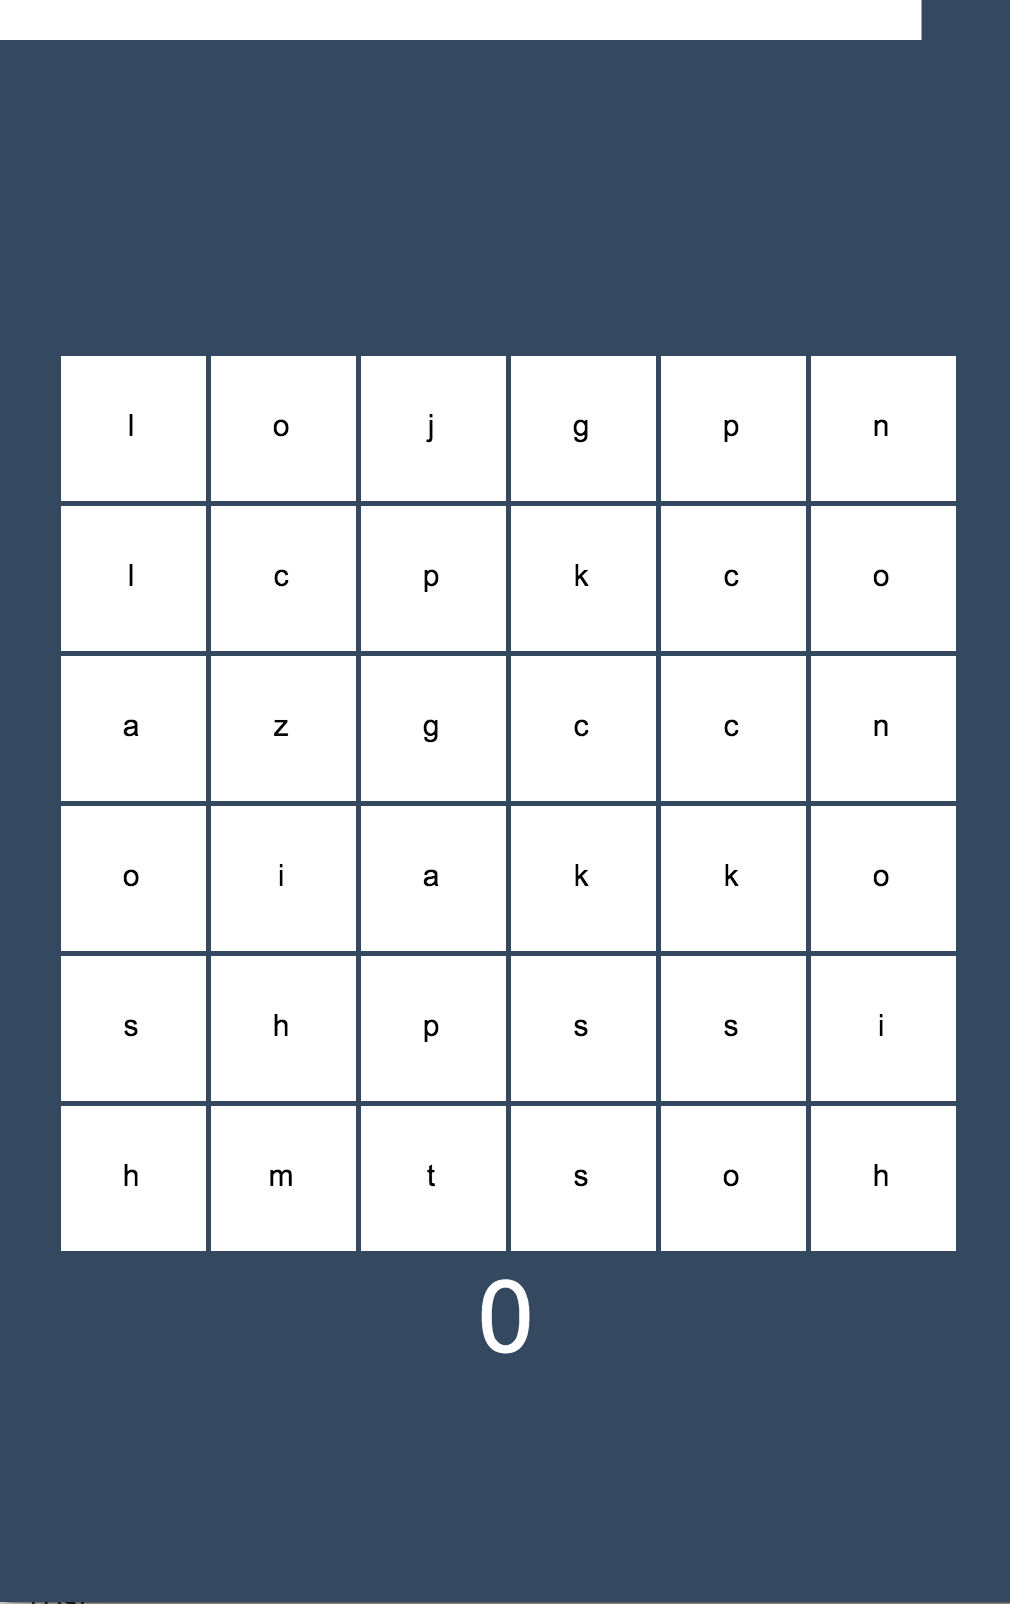
We’ll be using some of the lessons we learnt in the last tutorial in this one, so it might help to do that tutorial first but you should be able to follow along fine if you just want to do this one. The final product will look something like this:
Before we Get Started
As is the case with most of my tutorials, I will be building off a generic Phaser template I use for mobile games. If you want to follow along with this tutorial, and aren’t super comfortable with Phaser yet, you can download the template below:
If you already know you way around Phaser though this probably won’t be necessary.
IMPORTANT: If you are using the template, make sure you make the following code change, as we will not be creating a title screen for this game.
Modify your preload.js file so that it reflects the following:
var Preload = function (game) {};

Preload.prototype = {
  preload: function () {},

  create: function () {
    this.game.state.start('Main');
  },
};
Now the game will launch right into the main state, rather than going to the title screen first.
Matching Words Against a Dictionary
In this first part we are going to tackle what I think is the most interesting challenge of these types of word search games, and that’s how to figure out if a word is a valid English word or not.
Before we can start coding up a solution for this, we need a reference of valid English words to match against (good luck coming up with some kind of algorithm that can determine valid English words). If you want to build this in a different language, just swap out the dictionary for a different language.
So first thing’s first: find a dictionary. Most people have one lying around their house, just grab it and start writing down all of the words into a text file. Hopefully this shouldn’t take you any longer than a few weeks…
Just kidding! Of course. Fortunately, there’s a few good lists of words we can grab from the Internet and I ended up settling on this one. It wasn’t quite in the format I wanted for this game so I modified it so that words were separated by a space rather than a link break (you can grab that file if you’d like by downloading the source code for this tutorial).
There’s some words in that dictionary that won’t be possible to create in our game – like words with hyphens, parenthesis, apostrophes etc. – so you can remove those if you like but it’s probably not really worth it. Whatever your end result is, save it as a .txt file in your games assets folder.
1. Load the Dictionary into Phaser
First we will need to load the text file into memory in Phaser, surprisingly Phaser actually has a method for loading text files.
Add the following code to the preload method in your preload.js file:
preload: function(){
		this.game.load.text('dictionary', 'assets/dictionary.txt');
	},
This will grab all the text from the file and load it into Phaser. You can also load text into Phaser using a URL to a web address instead of a file.
2. Add a Loading Progress Indicator
Before we continue, let’s fancy up the loading screen a bit by adding a loading progress indicator:
Mdoify your preload.js file to reflect the following:
var Preload = function (game) {};

Preload.prototype = {
  init: function () {
    var me = this;

    var style = {
      font: '32px Arial',
      fill: '#ffffff',
      align: 'center',
    };

    this.text = this.add.text(
      me.game.world.centerX,
      me.game.world.centerY,
      'Loading: 0%',
      style
    );
    this.text.anchor.x = 0.5;
  },

  preload: function () {
    this.game.load.text('dictionary', 'assets/dictionary.txt');
  },

  fileLoaded: function (progress) {
    this.text.text = 'Loading: ' + progress + '%';
  },

  create: function () {
    this.game.state.start('Main');
  },
};
We’re currently only loading one file so the loading page will go by pretty fast anyway, but it’s nice to have some kind of loading indicator, especially if you start adding more files.
3. Checking for Matches
We’re not actually going to implement the word checking logic in the game just yet, but let’s walk through how we will go about checking and try an example.
The approach is actually pretty easy, we treat the text file as one giant string and use JavaScripts indexOf method to check for a substring within that giant string. In this case, the giant string is the entire dictionary and the substrings are individual words inside of that string (separated by spaces).
Add the following code to the create method in your main.js file:
var word = 'test';

if (me.game.cache.getText('dictionary').indexOf(' ' + word + ' ') > -1) {
  alert('exists');
} else {
  alert('does not exist');
}
The reason we put spaces at the start and end of the word is so that if we were searching for the word phan it wouldn’t trigger a match against the word elephant in the dictionary.
If you run the game in your browser now you should get an alert saying “exists” because we are checking if the word test is in fact a word (at least according to our dictionary). You can change test to any word you like, refresh the game, and check to see if the word exists. Once you’re done playing around, delete this code because we don’t need it anymore.
But what about optimisation? We need to know whether the user selected word matches one in the dictionary almost instantly (there will be a time limit on these games, and I doubt the player will like waiting around while we search the dictionary), and you might assume that searching through 60,000+ words would take a little time.
Surprisingly though, it doesn’t. Using that simple JavaScript function will return a result almost instantly, and the dictionary itself loads almost instantly on the preloading screen as well.
I had originally planned on dedicating this whole first part to solving the dictionary problem, but since it turned out to be so easy we’re going to go a little bit further in this tutorial.
Creating the Game Grid
Now we want to create the tiles on the screen. We need to create a 6×6 grid (or whatever size you want) and fill it with tiles that have letters on them.
1. Create the Settings Variables
First, we are going to create some settings in our create method to configure how the game will display on screen.
Modify the create method in main.js to reflect the following:
create: function() {

        var me = this;

        //Set the background colour of the game
        me.game.stage.backgroundColor = "34495f";

        //Declare assets that will be used as tiles
        me.tileLetters = [
            'a', 'b', 'c', 'd', 'e', 'f', 'g', 'h', 'i', 'j', 'k',
            'l', 'm', 'n', 'o', 'p', 'q', 'r', 's', 't', 'u', 'v',
            'w', 'x', 'y', 'z'
        ];

        //What colours will be used for our tiles?
        me.tileColors = [
            '#ffffff'
        ];

        //Set the width and height for the tiles
        me.tileWidth = 150;
        me.tileHeight = 150;

        //This will hold all of the tile sprites
        me.tiles = me.game.add.group();

        //Initialise tile grid, this array will hold the positions of the tiles
        //Create whatever shape you'd like
        me.tileGrid = [
            [null, null, null, null, null, null],
            [null, null, null, null, null, null],
            [null, null, null, null, null, null],
            [null, null, null, null, null, null],
            [null, null, null, null, null, null],
            [null, null, null, null, null, null]
        ];

        //Keep a reference to the total grid width and height
        me.boardWidth = me.tileGrid[0].length * me.tileWidth;
        me.boardHeight = me.tileGrid.length  * me.tileHeight;

        //We want to keep a buffer on the left and top so that the grid
        //can be centered
        me.leftBuffer = (me.game.width - me.boardWidth) / 2;
        me.topBuffer = (me.game.height - me.boardHeight) / 2;

        //Create a random data generator to use later
        var seed = Date.now();
        me.random = new Phaser.RandomDataGenerator([seed]);

        //Set up some initial tiles and the score label
        me.initTiles();

    },
There’s quite a bit we’ve added here, but most of it should be pretty clear with the comments provided. In this case I’m providing an array of all English letters and a single tile colour, but you could easily modify this if you’d like to use a different language or more colours.
The most interesting thing here is the tileGrid. This describes the structure of the game grid, and will be used to keep track of where individual tiles are. You can modify this array to look however you like (more rows, less rows) and the game will (eventually) automatically change to match.
At the end of the create method you will notice a call to initTiles() which doesn’t exist yet. We will be creating that now.
2. Initialise and Create the Tiles
The initTiles function will be responsible for rendering the initial tiles on the screen, so let’s add that now.
Add the following function to your main.js file:
initTiles: function(){

        var me = this;

        //Loop through each column in the grid
        for(var i = 0; i < me.tileGrid.length; i++){

            //Loop through each position in a specific column, starting from the top
            for(var j = 0; j < me.tileGrid.length; j++){

                //Add the tile to the game at this grid position
                var tile = me.addTile(i, j);

                //Keep a track of the tiles position in our tileGrid
                me.tileGrid[i][j] = tile;

            }
        }

    },
This function will loop through all the columns and rows that we defined in the tileGrid and add a new tile at each position. This function relies on a function called addTile to do that, which we will also need to create.
Add the following function to your main.js file:
addTile: function(x, y){

        var me = this;

        //Choose a random tile to add
        var tileLetter = me.tileLetters[me.random.integerInRange(0, me.tileLetters.length - 1)];
        var tileColor = me.tileColors[me.random.integerInRange(0, me.tileColors.length - 1)];
        var tileToAdd = me.createTile(tileLetter, tileColor);

        //Add the tile at the correct x position, but add it to the top of the game (so we can slide it in)
        var tile = me.tiles.create(me.leftBuffer + (x * me.tileWidth) + me.tileWidth / 2, 0, tileToAdd);

        //Animate the tile into the correct vertical position
        me.game.add.tween(tile).to({y:me.topBuffer + (y*me.tileHeight+(me.tileHeight/2))}, 500, Phaser.Easing.Linear.In, true)

        //Set the tiles anchor point to the center
        tile.anchor.setTo(0.5, 0.5);

        //Keep track of the type of tile that was added
        tile.tileLetter = tileLetter;

        return tile;

    },
This function will take an x and y coordinate and create a tile at that location. So we have already added our tile into the tileGrid which gives us an idea of where the tile should be conceptually, but then we need to figure out where that actually translates to on the screen.
If we have a tile that should sit in the position [2][3] then we can work out where to place it on the screen by doing 2 x tileWidth and 3 x tileHeight. We also add the top and left buffers to get the tiles centered and we also add half the tiles width or height so that it displays relative to the center of the tile (not left aligned).
You will notice that we are randomly choosing a letter and colour from the arrays we created earlier, and then we use both of those values to call the createTile function. This is another function we will have to create now to create the sprite for the tiles.
Add the following function to your main.js file:
createTile: function(letter, color){

        var me = this;

        var tile = me.game.add.bitmapData(me.tileWidth, me.tileHeight);

        tile.ctx.rect(5, 5, me.tileWidth - 5, me.tileHeight - 5);
        tile.ctx.fillStyle = color;
        tile.ctx.fill();

        tile.ctx.font = '30px Arial';
        tile.ctx.textAlign = 'center';
        tile.ctx.textBaseline = 'middle';
        tile.ctx.fillStyle = '#fff';
        if(color == '#ffffff'){
            tile.ctx.fillStyle = '#000000';
        }
        tile.ctx.fillText(letter, me.tileWidth / 2, me.tileHeight / 2);

        return tile;

    }
This function takes the letter and colour that is passed in, creates a square tile based on the colour and then adds some text on top of the tile with the letter that is passed in.
I’m generating the tiles using bitmap data, but if you would prefer you could easily replace this with image sprites for each tile (or maybe you would want to just have 1 image sprite for the tile and add bitmap text to the top of it).
Summary
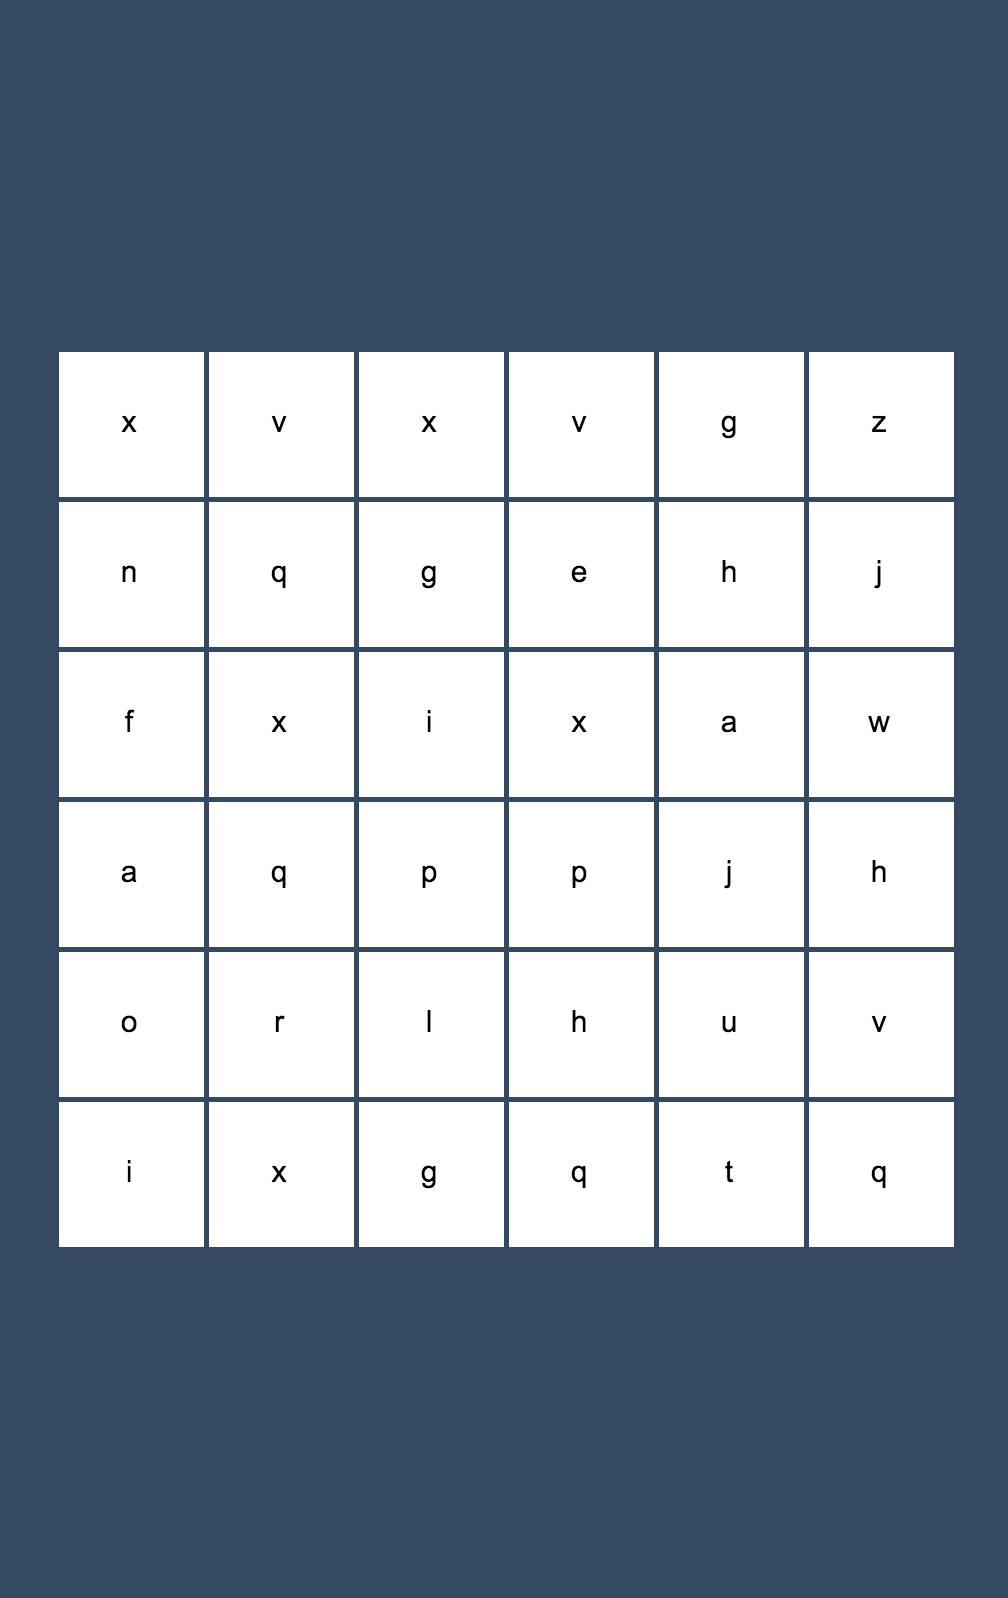
That wraps it up for Part 1, you should now have something that looks like this:
Nothing too exciting yet of course, but in the next part we will actually start building the game functionality. Keep an eye our for Part 2!