

If you’ve used pretty much any app at all, then you would have received a notification from it at some point. Notifications are little messages from a specific app that can pop up on the user’s device to alert them to something, even if they are not currently using that particular app.
There are two main types of notifications when it comes to mobile applications: local notifications and push notifications. It can be a little confusing to understand the difference, but essentially:
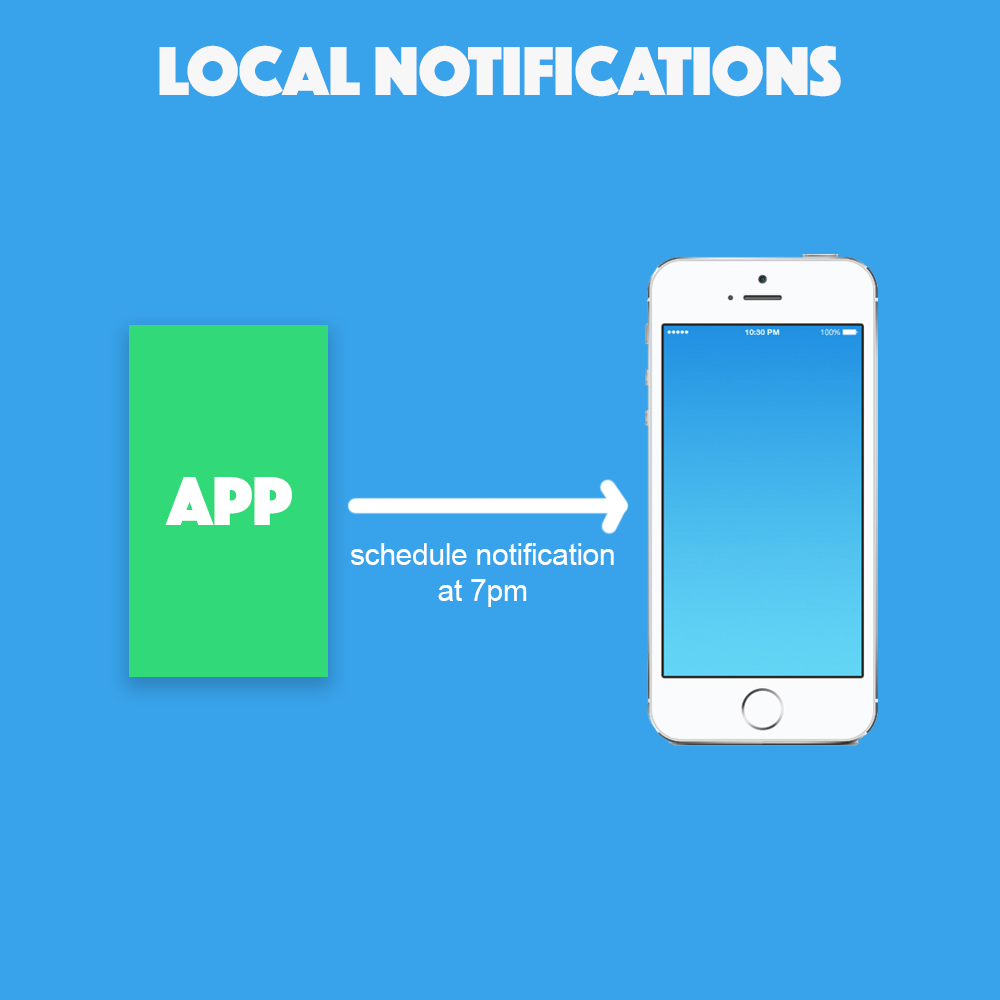
- Local notifications can only be triggered by events on the user’s device
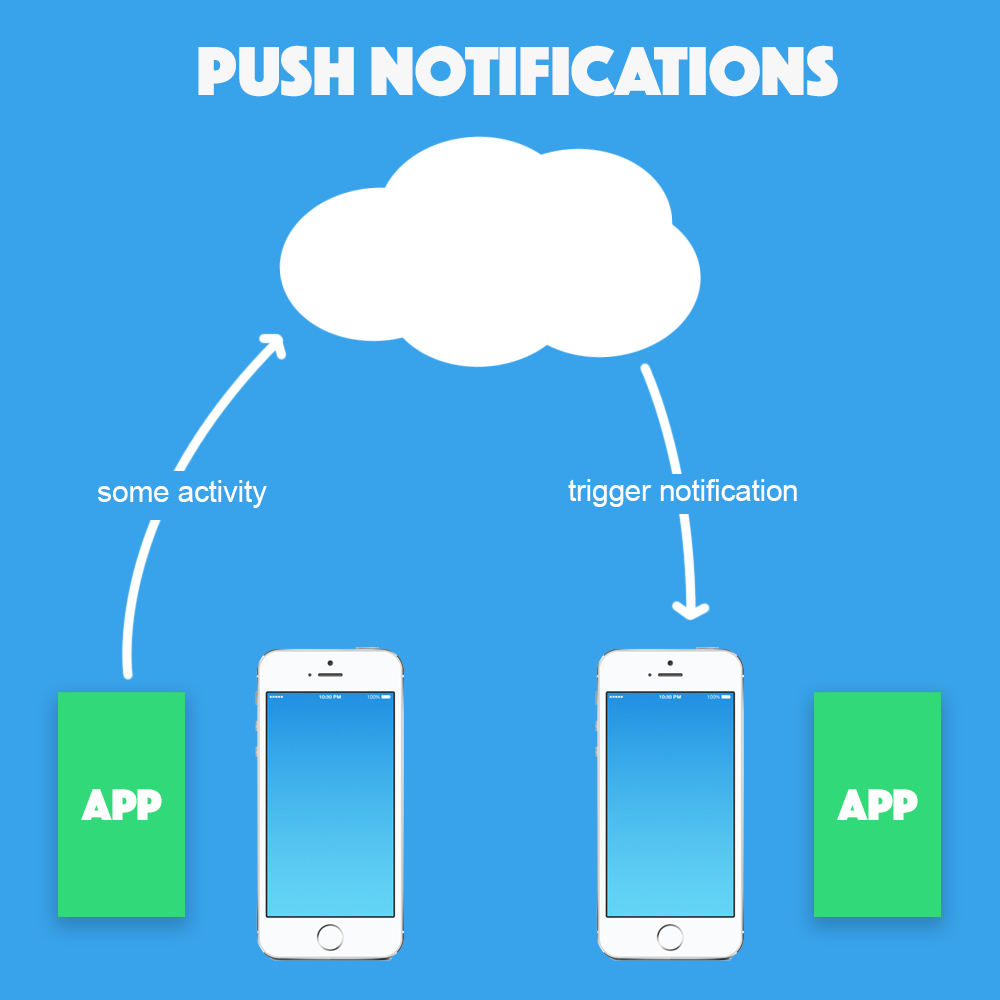
- Push notifications can be triggered by events outside of the user’s device
When using a local notification, the app talks to that user’s device and tells it to set up a notification that will be triggered later. When the user exits that app, the device knows when it needs to trigger that notification, so it’s not a problem that the app is no longer open. However, let’s say the app in question is a messaging app. If the user receives a message from another user after they have already exited the app, there is no way to notify that user of the new message with a local notification.
On the other hand, a push notification (although it looks identical to a local notification) can be sent to a user at any time, even if they have the app closed. This relies on an external service like the Apple Push Notification Service (APNS) or Google Cloud Messaging (GCM, which has now become Firebase Cloud Messaging), and those services can send a notification to a registered device at any time. This means that even though the user might have the application completely closed, a push notification can still be used to alert a user to a message that has been sent by another user.
Implementing push notifications can be quite tricky, and developers generally use a 3rd party service (like Ionic Push or Pushwoosh) to make the process a little easier. However, these services generally charge a monthly fee. Although local notifications are less flexible than push notifications, they are super simple to set up and don’t require any external services.
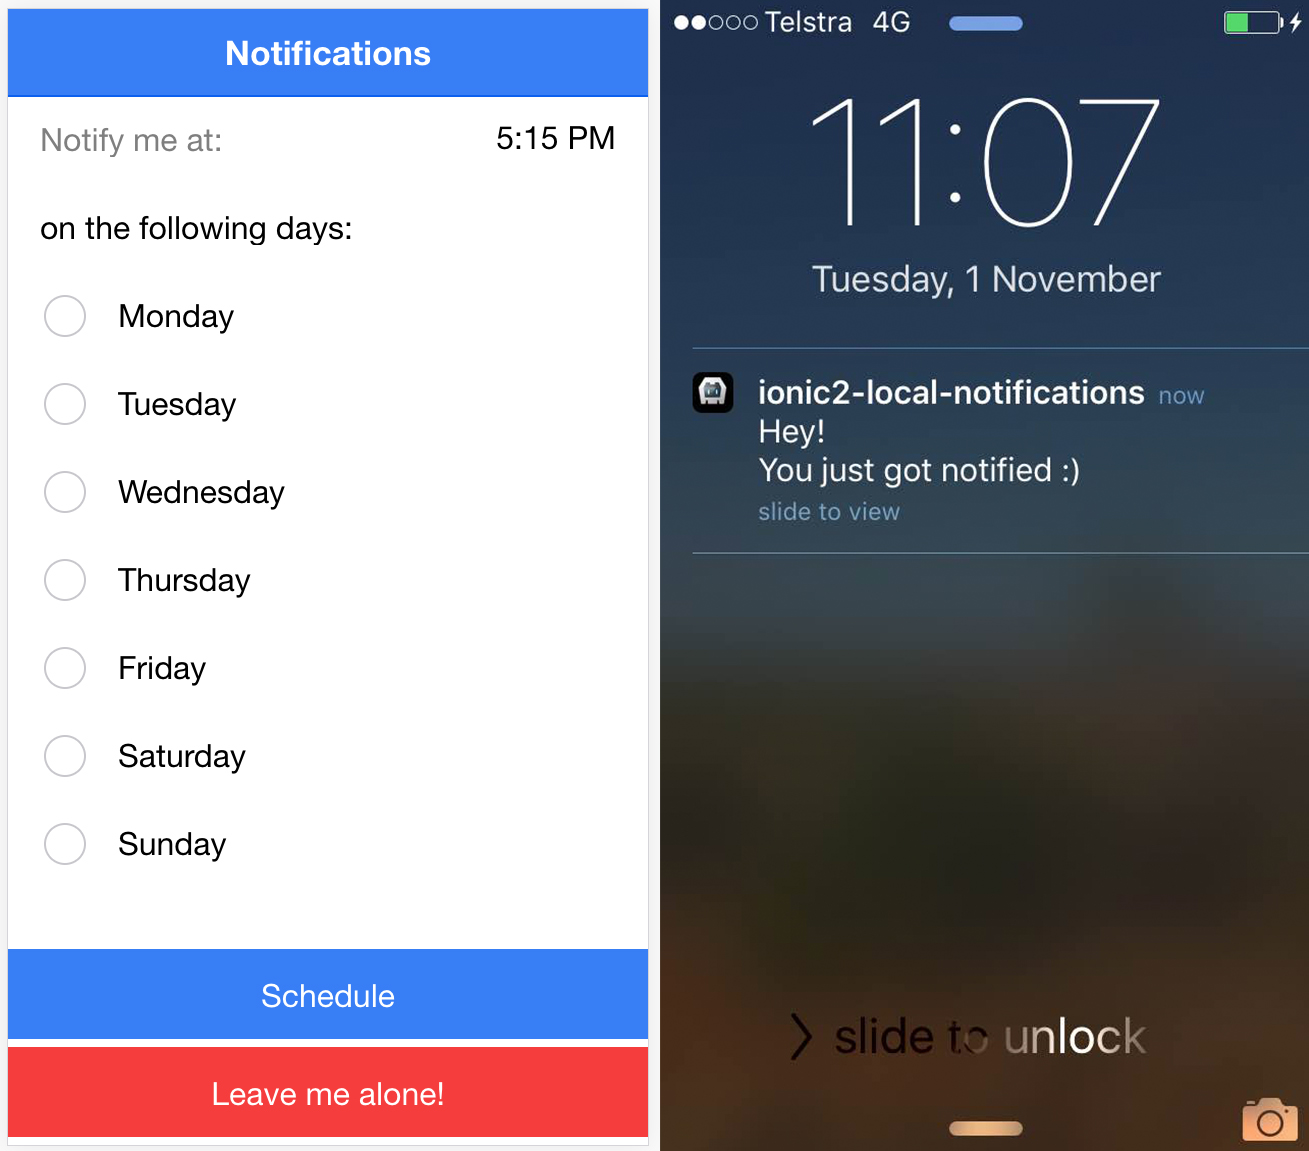
In this tutorial, we are going to walk through how you can create a basic application that can schedule local notifications. The application will allow the user to choose a time that they would like to be notified and days of the week that they would like to receive that notification for. In the end, it will look something like this:
Before We Get Started
Last updated for Ionic 3.7.1
Before you go through this tutorial, you should have at least a basic understanding of Ionic 2 concepts. You must also already have Ionic 2 set up on your machine.
If you’re not familiar with Ionic 2 already, I’d recommend reading my Ionic 2 Beginners Guide first to get up and running and understand the basic concepts. If you want a much more detailed guide for learning Ionic 2, then take a look at Building Mobile Apps with Ionic 2.
1. Generate a New Ionic 2 Application
Let’s start by generating a new Ionic 2 application. The application is just going to have one screen, so we are going to just stick with a simple blank application.
Run the following command to generate a new application:
ionic start ionic2-local-notifications blankRun the following command to make the new project your current directory:
cd ionic2-local-notificationsWe are also going to have to install a couple of dependencies. We will be making use of the Local Notifications plugin, so we will need to install that.
Run the following commands to install the Local Notifications plugin:
ionic cordova plugin add de.appplant.cordova.plugin.local-notificationnpm install --save @ionic-native/local-notificationsWe are going to be working with dates and times as well, so to make our job a little easier we are going to install the Moment.js library, which makes working with dates and times a lot easier.
Run the following command to install Moment.js:
npm install moment --saveYou will also need to add the plugin as a provider in src/app/app.module.ts
import { BrowserModule } from '@angular/platform-browser';
import { ErrorHandler, NgModule } from '@angular/core';
import { IonicApp, IonicErrorHandler, IonicModule } from 'ionic-angular';
import { SplashScreen } from '@ionic-native/splash-screen';
import { StatusBar } from '@ionic-native/status-bar';
import { LocalNotifications } from '@ionic-native/local-notifications';

import { MyApp } from './app.component';
import { HomePage } from '../pages/home/home';

@NgModule({
  declarations: [MyApp, HomePage],
  imports: [BrowserModule, IonicModule.forRoot(MyApp)],
  bootstrap: [IonicApp],
  entryComponents: [MyApp, HomePage],
  providers: [
    StatusBar,
    SplashScreen,
    LocalNotifications,
    { provide: ErrorHandler, useClass: IonicErrorHandler },
  ],
})
export class AppModule {}
2. Set up the Home Page
All the functionality for this application is going to be contained within our HomePage component. Generally, it would probably be a better idea to separate the logic for handling local notifications into its own provider (which would then allow for reuse outside of the home page). The requirements for this app are quite simple though, so it’s going to be more straight forward to just add all the functionality into the home page.
We’re going to start off by creating a basic skeleton of the TypeScript file for the home page, and then we will add in the functionality bit by bit.
Modify src/pages/home/home.ts to reflect the following:
import { Component } from '@angular/core';
import { NavController, Platform, AlertController } from 'ionic-angular';
import { LocalNotifications } from '@ionic-native/local-notifications';
import * as moment from 'moment';

@Component({
  selector: 'page-home',
  templateUrl: 'home.html'
})
export class HomePage {

    notifyTime: any;
    notifications: any[] = [];
    days: any[];
    chosenHours: number;
    chosenMinutes: number;

    constructor(public navCtrl: NavController, public platform: Platform, public alertCtrl: AlertController, public localNotifications: LocalNotifications) {

        this.notifyTime = moment(new Date()).format();

        this.chosenHours = new Date().getHours();
        this.chosenMinutes = new Date().getMinutes();

        this.days = [
            {title: 'Monday', dayCode: 1, checked: false},
            {title: 'Tuesday', dayCode: 2, checked: false},
            {title: 'Wednesday', dayCode: 3, checked: false},
            {title: 'Thursday', dayCode: 4, checked: false},
            {title: 'Friday', dayCode: 5, checked: false},
            {title: 'Saturday', dayCode: 6, checked: false},
            {title: 'Sunday', dayCode: 0, checked: false}
        ];

    }

    ionViewDidLoad(){

    }

    timeChange(time){

    }

    addNotifications(){

    }

    cancelAll(){

    }

}
Aside from our normal imports, we are also importing LocalNotifications from Ionic Native which will make the local notifications plugin easier to work with, and we are also importing the moment library that we installed.
We’ve set up a few member variables here as well, so let’s go through what each of those do:
- notifyTime will contain an ISO datetime string to set a default time for the
<ion-datetime>input field we will be using - notifications is an array that we will add all of the local notifications we plan to add to
- days is an array that will contain objects representing the days of the week
- chosenHours will represent the hour of the day that the user wants to be notified
- chosenMinutes will represent the minutes of the hour that the user wants to be notified
We then set up some default values for this in the constructor function. In the case of notifyTime we are making use of the Moment.js library here, by creating a new “moment” using the Date object, and then calling the format method on that. This will give us a datetime string in ISO format, which reflects the time in the user’s local timezone. We need the date to be in ISO format in order to work with the <ion-datetime> input, and it’s actually quite difficult to get an ISO string in the user’s local time zone, so we use Moment to handle that for us.
Rather than just having an array of strings representing the days of the week, we make them objects with additional properties. The dayCode represents the day of the week in number format, which reflects how days of the week are represented when working with dates in Javascript. The checked property will allow us to keep track of whether the user has selected a specific day or not.
We also set up a few more functions that we will implement in a moment. The timeChange function will listen for changes to the <ion-datetime> input that we will add to the template, addNotifications will handle calculating the notification times and scheduling them, and cancelAll will simply delete all currently scheduled notifications.
We are going to come back and finish implementing these functions soon, but first, we are going to implement our template.
3. Set up the Template
Our template is reasonably straight forward, we are just going to add a <ion-datetime> component to allow the user to select a time of the day, a checkbox for each day of the week, and two buttons: one to schedule the notifications, and one to cancel them.
Modify src/pages/home/home.html to reflect the following:
<ion-header>
  <ion-navbar color="primary">
    <ion-title> Notifications </ion-title>
  </ion-navbar>
</ion-header>

<ion-content>
  <ion-list no-lines>
    <ion-item>
      <ion-label>Notify me at: </ion-label>
      <ion-datetime
        displayFormat="h:mm A"
        pickerFormat="h mm A"
        [(ngModel)]="notifyTime"
        (ionChange)="timeChange($event)"
      ></ion-datetime>
    </ion-item>

    <ion-item>
      <ion-label>on the following days:</ion-label>
    </ion-item>

    <ion-item *ngFor="let day of days">
      <ion-label>{{day.title}}</ion-label>
      <ion-checkbox [(ngModel)]="day.checked" color="primary"></ion-checkbox>
    </ion-item>
  </ion-list>
</ion-content>

<ion-footer>
  <button (click)="addNotifications()" ion-button color="primary" full>
    Schedule
  </button>
  <button (click)="cancelAll()" ion-button color="danger" full>
    Leave me alone!
  </button>
</ion-footer>
The <ion-datetime> component is super powerful and flexible. We are using displayFormat to control how the input displays after a user has selected it, and pickerFormat to control what the datetime picker looks like when the user is selecting a time. The format we are using will allow a user to pick a time using the 12 hour format. There are tons of configuration options available for <ion-datetime> so I would highly recommend taking a look at the documentation.
We also hook <ion-datetime> up to our notifyTime variable with ngModel so that we can set the current time to whatever the time is right now. Usually we would use this two way data binding to then access the value the user has chosen from the TypeScript file, but instead we are going to use the (ionChange) event to keep track of changes. This allows us to grab the hours and minutes that the user has chosen specifically, which is easier for us to work with than trying to manipulate the ISO string.
The only other thing of interest here is our checkboxes. We create a checkbox for each day in our days array, and then we set up two-way data binding on the checked property. This way, if a user selects or unselects a specific day it will be reflected in our days array.
4. Implement the Functions
Now let’s work through implementing the rest of the functions in the TypeScript file, we are going to do them one at a time and talk through them.
Modify the
timeChangefunction in src/pages/home/home.ts to reflect the following:
timeChange(time){
        this.chosenHours = time.hour.value;
        this.chosenMinutes = time.minute.value;
    }
This function is super simple, we just grab the hour and minute values from the datetime object that is passed in.
Modify the
addNotificationsfunction in src/pages/home/home.ts to reflect the following:
addNotifications(){

        let currentDate = new Date();
        let currentDay = currentDate.getDay(); // Sunday = 0, Monday = 1, etc.

        for(let day of this.days){

            if(day.checked){

                let firstNotificationTime = new Date();
                let dayDifference = day.dayCode - currentDay;

                if(dayDifference < 0){
                    dayDifference = dayDifference + 7; // for cases where the day is in the following week
                }

                firstNotificationTime.setHours(firstNotificationTime.getHours() + (24 * (dayDifference)));
                firstNotificationTime.setHours(this.chosenHours);
                firstNotificationTime.setMinutes(this.chosenMinutes);

                let notification = {
                    id: day.dayCode,
                    title: 'Hey!',
                    text: 'You just got notified :)',
                    at: firstNotificationTime,
                    every: 'week'
                };

                this.notifications.push(notification);

            }

        }

        console.log("Notifications to be scheduled: ", this.notifications);

        if(this.platform.is('cordova')){

            // Cancel any existing notifications
            this.localNotifications.cancelAll().then(() => {

                // Schedule the new notifications
                this.localNotifications.schedule(this.notifications);

                this.notifications = [];

                let alert = this.alertCtrl.create({
                    title: 'Notifications set',
                    buttons: ['Ok']
                });

                alert.present();

            });

        }

    }
This function contains the real meat of the application, it’s what handles actually setting up the notifications. Scheduling a notification is actually quite easier, all we have to do is create an object that looks like this:
let notification = {
  id: day.dayCode,
  title: 'Hey!',
  text: 'You just got notified :)',
  at: firstNotificationTime,
  every: 'week',
};
and then schedule it like this:
this.localNotifications.schedule(notification);We can also schedule multiple notifications at once by providing an array of notification objects, instead of just a single object. The hardest part of what we are trying to do is figuring out when to schedule the notification. We need to set the at property to the date and time that we want to display the notification using the Date object, and then that notification will repeat based on whatever we set as the every property. So, the hard bit is actually calculating what that at property should be.
To do this, we first get a reference to the what the date and time are right now by creating a new Date object, and we also keep a reference to the number value of the current day. By referring to Monday as 1, and Wednesday as 3, we can very easily work out the distance between days.
Next, we loop through all of the days in our days array and check for any that have been selected. For any that have been selected, we first get a reference to the current date and time, and then we figure out how many days away from the current day the selected day is. Wednesday is two days away from Monday, but we also need to account for the case where we go into the next week, so if the resulting number is negative we add 7 to it. This way, Monday will be 5 days away from Wednesday (which is correct if we go through to the next week).
Once we have that calculated, we add 24 hours to the date time for however many days away the selected day is from the current date. Then we also need to set the hours and minutes of the day that the user wants to be notified on that specific day, so we do that as well. We then create the notification object and add it to the array.
Finally, once we have looped through all of the days and created the notifications array, we first cancel any existing notifications and then schedule the new ones.
Now let’s add the final function.
Modify the
cancelAllfunction in src/pages/home/home.ts to reflect the following:
cancelAll(){

        this.localNotifications.cancelAll();

        let alert = this.alertCtrl.create({
            title: 'Notifications cancelled',
            buttons: ['Ok']
        });

        alert.present();

    }
This is also a very simple function, we just call the cancelAll method of the plugin to delete any existing notifications.
The application should now be finished and ready to use! In order to test this application, you will need to run it on a device or simulator, it won’t work through the browser since it is using a Cordova plugin.
Summary
Local notifications, although not quite as powerful as push notifications, have a lot of uses. They are obviously viable in use cases like this where we are scheduling reminder type notifications up front, but you can even get a little more creative with them.
At the start of this tutorial, I said that you couldn’t use local notification to notify a user of a message sent by a different user of the app. That’s not entirely true. If you were to use a plugin that allows your app to continue running in the background when the user leaves your app but doesn’t completely close it, your app could listen for new messages coming in and then trigger a local notification from the background. That notification would then pop up alerting the user to the message even though they do not have the app open, but if the user had the app completely closed then they wouldn’t receive the notification (like they would with a push notification).
There’s also ton more you can do with the Local Notification plugin, like deleting specific notifications and checking if certain notifications are scheduled, so make sure to check out the documentation.